Thursday, September 29, 2011

The Portable Neverness

As some of you know, or might have read, I travel a lot for business, and as a result, often my hobby time is neglected. Worse yet, the relaxing escape that mini-painting brings me is not available when I need it most. So my dear friend, Mrs. Bink, introduced me to a solution that I already had: go portable!


Years ago I got (either as a gift or I bought it myself, I can't recall) a small tackle box. I want to say we got this at K-Mart. It's original purpose was to be used as a place to store, divide and subdivide my various gaming dice. Dumping all of those into another tackle box I proceeded, at her kind suggestion, to organize this into a portable paint box/station/mini-carrier. This particular box divides into two sections.

The top section:


Fits the smaller paint pots perfectly, the rear groove fits the older paints well too. The front is perfect for brushes, etc. The bins are customizable and I can 'slot' in or out the dividers. Mrs. Bink also suggest that the inside of the top could be used as a palate or workstation. Not sure if I will do that however...

The bottom is far bigger and can store most GW vehicles! Here I have things like glues, clippers, decals, a water bottle, etc.


The models I brought with me on this trip are store securely and snug in this bottom (with some bits stored in the top half of the box)


These are two land speeders, one you might have seen some work in progress shots of in a prior blog, and the other one is the next one I will tackle. Also, being that the main blog is called 'Pods to drop...' I have brought a drop pod on sprue (pre-primed) and still in it's box, which I hope to get a good start on during the week that I'm up here.

If you're curious in the exact model of this box, I have never removed the product sticker, so, assuming it's still in production and available, perhaps you can still find it if you so desire:


Hopefully I will actually have some down time to do some modeling!

-Joel

Wednesday, September 28, 2011

Neverness enters the Space Race


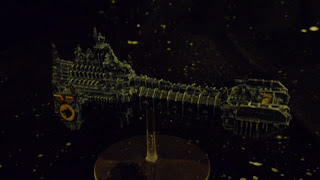
+++From the cold ship yards of Fenris, emerges the battle barge 'Ragnar's Breath'. Pictured above on it's first test voyage, not yet fully armed and outfitted with the killing arsenal that will rid the nearby systems of the the xenos scum that pollute them. Hark, for the origin of this majestic war machine is upon you.+++


It's been damn near 10 years since I last played BFG. Warfrog and I spent a solid day playing the heck out this game, and I don't think either of us has messed with it since. However Masta Cheef and his grot underlings have been playing it off and on and bloging away with some impressive paint-jobs, and with my gathering of the Rogue Trader supplements for the RPG, my interest in finally building my fleet has been growing. Recently while shifting my...um....'stock' around, I came across this battle barge in a zip-loc GW UK parts bag. Why I ordered this like this I have no idea, but alas here it was:


Cleaned up, which was to me a far more challenging task then I originally thought (remember this statement, it becomes the theme) I figured I could quickly paint this between business trips.
Here it is base coated in Shadow Grey. This was a pain in the ass, as all the little details were preventing paint from filling the voids. Once I got to a satisfactory point, I wanted to proceed, but the fricking model kept chipping. So, again, satisfied with it at a certain point, I took it outside and blasted it with one of my favorite art tools: Workable Fixative.

The mid coat and highlights went fairly quickly, and here it was just before the final highlight stages and assembly.


And a closer view...


Assembly, again was a pain in the ass that I thought would be far less challenging. Once I got most of it together, I added decals to the...fin things with the yellow circles... and then proceeded to build it most of the way.


Here it is without the turrets and lances -just don't have the time tonight to do them and do this blog. Also I've been itching to play around with photographing this ship against the star field background that I made a few years ago using felt squares, paint and a tooth brush. This is my star field for playing the game on but I works good for photos too I think. With slightly better lighting, I think I can achieve the effect I'm after (my favorite pic is the one that I started this blog entry with)


Once I finish this (adding the guns), and move on to the rest of the fleet, I will take more pics and experiment a bit more with the lighting.

-Joel


Monday, September 26, 2011

Pods to Drop and Lands to Raid (and Speed) part 8

It's been a long time since I was able to focus on some mini painting, but this weekend I made a bit of progress on the Land Speeder Typhoon (that I haven't touched since...late June?) In the pic above you can see where I have touched up the middle coat, and worked on the Aquila emblem on the front as well as the shoulder pads of the crew.

This pic is a focus on the gunner. The chest Aquila gave me a real challenge. Ideally I would like to paint these models in a disassembled state prior to building them, but the necessities of having a field able army that doesn't look like a pack of cripples sort of gets in the way of this practice. Typically for Space Wolves I base the Aquila on the chest with Fiery Orange, then mid-coat with varying degrees of Sunburst Yellow before topping it off with highlights of Bad Moon Yellow and a dash of Skull white. But, this rarely works as the Bad Moon yellow, it not thick enough, can give off a bizarre greenish cast or worse, run into the grooves. There for a few strategic applications of brown ink helps contrast the grooves, and a muted wash of orange ink will help mute the yellow a bit, before adding few additional highlights of the yellows. I feel this is not very rewarding work however, and since I'm liking the bronze/gold effect on the Aquila on the front of the Speeder (and the Drop Pod -see 1st entry in this series) I'm tempted to try this out on the next Wolf Pack that I paint.

Here are the collected parts of the Typhoon, I finally painted the launchers choosing to make the warheads red (I have made them white on past models, but ultimately feel that the red contrasts better).

As further proof of my old school cred:

When I did the original Land Speeder a few years back I opted to use these decals. Having used the classic 'Ragnar' style decals over the years, I found them to be a source of frustration, especially trying to apply them to the unforgiving curvature of the Space Marine shoulder pads. In an effort to be unique, and to bring my army around full circle, I've decided to use this style for my army's company markings. Also, I feel this mixes well with the newer style, and so my army will contain a mix (sometimes on the same model) of these emblems.

...and here they are, applied to the two crew members, Also note that the Landspeeder Typhoon now has it's final highlight of Skull White on the hull and the marines.

Just a few more steps and this will be done!

_Joel