Monday, June 24, 2024

Sheba.

 Sheba was our wonderful, characterful dog. She was a very good dog, not the kind that would just take off on you or grossly misbehave. She loved her cat buddies and could follow commands well. She was less of a pet and more like a companion. She was family. Sadly she ended up having a cancer that ended her life and she held on for as long as possible. 


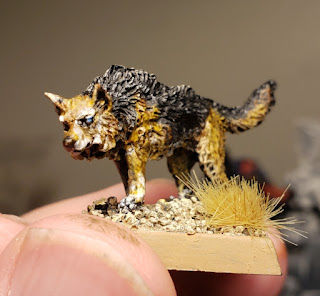
During her final days I wanted to honor her somehow so I found a miniature of a wolf from the Reaper miniatures line that sort of resembed her. Mrs. Neverness has always felt that her totem spirit was a wolf and we have Native American wolf imagery throughout the house, so it seemed fitting to overlay Sheba's color pattern over a wolf template like this. But Sheba passed away before I could get past the priming stage. And for years this model has sat in the background queue with only it's base painted. 


Well, Mrs Neverness reminded me that I should finish painting this miniature, so one afternoon I made a go of it and this was the result. 


I felt the need to highlight the Black parts of her coat even though this is not consistent with reality it does give depth to the miniature. 


Also you might be able to tell but I gave the miniature different colored eyes. Sheba had heterochromia, which is the condition where one eye is a different color from the other. Some folks found this unsettling, but we just thought this was part of what made her such a cool dog.

All these years later and we miss her still, and I am pleased to finally complete this tribute to Sheba. 

Sheba and I.


Monday, June 17, 2024

Primaris Lt. In Phobos Armor

 Do I really need another Primaris Lieutenant? (Does anybody?) Well, yeah, I do. This particular guy will fit in nicely with my Reivers as well as the Eliminators unit I constructted alongside this guy. They were finished during the March For Macrage challenge, but this poor chap was sidelined. -Until now!

They're not garters, they're knife straps!" 

Of course I basecoated the blue armor using my old Space Marine Blue. I hope I can find another paint pot of this color eventually, or at least a good analog for it. 


Let's cut to the chase, since I have shown these steps ad nauseum on this blog  already and I just don't feel the need to be that redundant at this moment.  I pretty much painted him like the examples I've seen in Imperium Magazine and elsewhere, with the exception that I painted his mask red with a white stripe running down the middle to denote his Lieutenant rank. I think this looks pretty cool, even though this might increase the odds of him getting shot in the face. Of course I realized well after the fact that these colors should be inverted, but I like the way this turned out so I'll leave it be. 


Finally, the dreaded decal stage.  Thankully this wasn't too problematic and I only used two decals on this model. 


And with that stage completed he is done. Normally I would probably add a few grass tufts but I have already packed them away for the move.  

And yes my family are moving to new house and everything is in chaos and disarray. Granted I'm not moving far, just 20 acres away, but it's turnng out to be a long drawn out affair which has stopped my hobbying for the time being. Hopefully things will pick back up soon. 


Tuesday, June 11, 2024

Venom #2 (Part 3)

 I was able to make a decent amount of progress on this model since last time. Really the only thing left to do was the gunner. Somehow through the back and forth that Da Masta Cheef and I did with this thing ("Take this." "No, you!" Etc.) One of the sprues disappeared. 


So I had to build the gunner from a variety of bits.  The legs and right arm are from the original 3rd edition Dark Eldar Warrior sprue, the torso is from the Venom kit and so is the head. The arm with the chain is from the Wyches kit. 


Yeah, he is one kitbashed fellow, but I think he turned out well. He seems a bit more relaxed than the gunner from Venom #1, who looks like she just wants to kill everyone. This guy is a more casual kind of killer. You can compare and contrast them with the last two pics in this post.


The last thing to do was affix the canopy to the cockpit. This was done using Testor's Clear Parts Cement, a niracle affixing agent I wish I had when I was building model planes as a kid. 


And here they are together. My fleet of dread murder elf skimmers has doubled!


Hopefully I can get the next one done soon-ish and finally start on some Raiders. I would love to finally field this as a proper army by the end of the year, but we shall see. 

Wednesday, June 05, 2024

Blood Axe Kaptin (Part 4)

 At the end of Part 3 I had stated that I felt that this guy was mostly done, but that it needed something else...

"Sumfink! Go git 'em!"

That's right, an attack squig. Which definitely meets the criteria of "some thing".  And the one I chose was this classic Rogue Trader era ork squig. Well, technically a tyranid squig. It's a bit of a complicated piece of lore that was only ever published once (White Dwarf #145 specifically). But nevertheless this classic freaky squig fit perfectly on my Blood Axe Warboss' base and gives a sense of menace. Mirthful menace mind you, but menace. 

Bare metal.

Unfortunately the tab had to go!

Primed.  

For such an old squig, it's still fairly large. Here he is on equal footing being compared to a Dark Eldar warrior. 

It kind of looks like a fleshy battle-bot in a way...

I based-coated this thing using Contrast Paints. Skeleton Horde for the claws, teeth and spikes, and Blood Angels Red for the skin. 

Contrast Paints basedcoat. 

Next I washed the model in Agrax Earthshade then gave it a layer of Khorne Red. The boney bits were given a layer of Screaming Skull with Wraithbone highlights. 

Mostly done.

Once he was done it was just a matter of affixing the squig, now names Sumfink, to the base of this Warboss, which a bit of superglue took care of in no time. 

Left side details

I'll work out a name for this big git eventually. But like many of my characters, sometimes they earn their names during a game.  With all I got going on, that may be a while. 

Rear details.

To end this project I added a few grass tufts to the base.  The final thing left to do is to add a clear coat to help reduce the chance of chipping the paint.

The job's done!

And now my Blood Axes have a dedicated leader. WAAAAGH!