Showing posts with label Primaris. Show all posts

Thursday, October 31, 2024

Ultramarines Redemptor Dreadnought (Part 4)

 With mere hours of the year's Dreadtober challenge left, I managed to get my project completed. 


I used 'Ard Coat to apply the decals on this model. This was particularly necessary for the III icon on top the red circle. These two overlaying decals were from a decades old sheet and the red circle almost disintegrated when trying to apply it  I had to repaint it using Mephiston Red before applying the 'Ard Coat layer to get it ready for the roman numeral three.  


I didn't talk about it in the last post, but toward the end of the construction process I decided to use some of the left over bits from the Venerable Dreadnought kit (my Dreadtober project from 2021) to give this thing a bit more flare. The most prominent one being the shield with the terminator honors and skull jewelry  


On his back he has the round Adeptus Mechanicus shield on display. On the examples of painted versions of this model, I don't think I can recall ever seeing anyone paint in the palte that Ad Mech icon on in Ad Mech red. I decided to give it a shot and I think I like the way it turned out. 


The left side of the model doesn't have any decals. it just sort of happened that way!


One of the joys of this model is that the main guns can be swapped out. I see myself using the plasma gun mostly but the assault cannon one is just too cool to leave on the sprue. 


The plants on the base are an assort of grass tufts and Dumb Cane, a new thing I picked up from my local Hobbytown store by a brand called Gamers Grass 


This turned out to be a project that I was very satisfied with in the end, and I look forward to next year! 

Tuesday, October 29, 2024

Ultramarines Redemptor Dreadnought (Part 3)


WIP continues.

Progress on this metal hulk continues. Well, he's a plastic model of a metal hulk anyway. Regardless of all that, he is now blue! With the Dreadtober deadline for my stated project fast approaching I set about trying to achieve my month-end goal.  


The basecoats.

The basecoats were easy and quick. This is primarily because there were really just two colors, Space Marine Blue and Delta Ceramcoat Metallic Pewter (I prefer this over Leadbelcher, but that would suffice if I had to resort to it). 


First stage mid-coats.

Macrage Blue was the next layer added to the blue followed by Ultramarines Blue and edge highlighted with Fenrisian Grey


"Guve me details or give me death!"

Getting down to the wire as the days of the month dwindle down to hours. It's mostly the minor details and the big guns that I need to knock out before the final stage of decal application. But can I make that deadline?  With the real-life obstacles before me, my spare time is going to be (and for too much of this month it's already been) sparse and fleeting, but we'll see what I can do! 

Thursday, October 24, 2024

Ultramarines Redemptor Dreadnought (Part 2)

 And finally, a progress update:


Forgive my tardiness on this update. I found the construction of this Remdemptor Dreadnought to be a tedious affair. And, much to my chagrin and annoyance, I made multiple mishaps along the way that set me back a bit as well. 


The biggest one, and the one I can't figure out how to overcome, is that somehow the bottom door cover doesn't go far enough up so that the top door will set into the groove on the lower door. I haven't been able to figure how I screwed this up, so I moved on. I feel that it gives the semblance of an underbite on this thing which amuses me. 


And yes,, I am keeping this in sub-assemblies for easier painting. 


I love that the guns are interchangeable. A concept I hope the GW design team allows on more kits. 


The left arm was the biggest challenge. I kept making mistakes in assembly and had to tear it apart a few time to get it right. It's not correct as the joint that connects into the should is upside down. I couldn't fix that with damaging the model so I used a piece of sprue to make a stud for the armor plate to attach to.  Desperate necessity for the win I suppose...


I didn't want to spend too much time on the base but I didn't want into be plain either. I cut up a few pieces of sprue to use as rubble chunks and tossed on a few skulls before gluing down some grit. It's subtle but it works. 


And finally, I primed this brute. He is far from done but I celebrated getting to this stage! 


And now, let's get painting! 

Monday, June 17, 2024

Primaris Lt. In Phobos Armor

 Do I really need another Primaris Lieutenant? (Does anybody?) Well, yeah, I do. This particular guy will fit in nicely with my Reivers as well as the Eliminators unit I constructted alongside this guy. They were finished during the March For Macrage challenge, but this poor chap was sidelined. -Until now!

They're not garters, they're knife straps!" 

Of course I basecoated the blue armor using my old Space Marine Blue. I hope I can find another paint pot of this color eventually, or at least a good analog for it. 


Let's cut to the chase, since I have shown these steps ad nauseum on this blog  already and I just don't feel the need to be that redundant at this moment.  I pretty much painted him like the examples I've seen in Imperium Magazine and elsewhere, with the exception that I painted his mask red with a white stripe running down the middle to denote his Lieutenant rank. I think this looks pretty cool, even though this might increase the odds of him getting shot in the face. Of course I realized well after the fact that these colors should be inverted, but I like the way this turned out so I'll leave it be. 


Finally, the dreaded decal stage.  Thankully this wasn't too problematic and I only used two decals on this model. 


And with that stage completed he is done. Normally I would probably add a few grass tufts but I have already packed them away for the move.  

And yes my family are moving to new house and everything is in chaos and disarray. Granted I'm not moving far, just 20 acres away, but it's turnng out to be a long drawn out affair which has stopped my hobbying for the time being. Hopefully things will pick back up soon. 


Wednesday, April 03, 2024

March for Macrage '24 (Part 5)

 Here's the final miniature I was able to finish for the March For Macragge challenge. I completed him, well actually I painted the entire model, on March 30th. This was such an easy and satisfying miniature to paint. 


For the sake of brevity I won't blather on about the painting steps unless it's something I've not chronicled elsewhere. For example the steps for painting the cloak was discussed when I revealed the Eliminators

Basecoats.

The sword was an interesting departure. Perhaps I was inspired by a recent game I had against Necrons. No, not the  necrons themselves but my Deathwatch Librarian. When I painted him I made his force sword all green and glowy and during that game, I kind of realized how much I like it. 

Stepping out to smite the foe! 

So of course I replicated it on this guy. I painted the tip and the  runes on the blade using Moot Green. Then lightly applied Straken Green in layers to make a sort of faded effect before then adding a glaze of Tesseract Glow. The. I finished it off with a highlight of Stormhost Silver. 


Green and glowy.

This was such a quick model to paint. Before I knew it, I was slapping down the tufts! I was, and still am a little bit, tempted to paint his eyes with a electrical blue effect, but decided against it.

The finished model.

Peaking out from the cloak you can see a hint of his chapter icon. I free-hand painted this as trying to get a decal to work right might have driven me over the edge. I am pleased with how it turned out considering how subtle it is. If hadn't I would likely have just left blue. 

Another view of the sword. 

I decided at the last minute to keep his book black. The idea of a guy running around with a "little black book" amuses me and it's kind of a nod to the WHFB Dwarves of old.

The little black book.

Here he is joined up with the unit I will most likely join him up with. It's not just because they've coordinated their wardrobe, but the mutual benefits in the current edition of the game are quite good. 

Killing with friends. 

Hopefully we can get hims, and all the rest of my #MarchForMacragge models, on to the table top soon! 


Monday, April 01, 2024

March for Macrage '24 (Part 4)


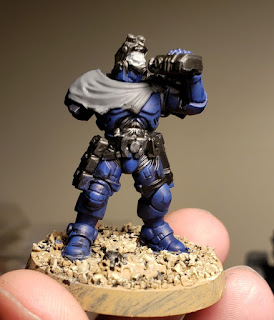
"Whoa, you guys aren't gonna believe this...!"

I like these models, and I just couldn't resist moving them up the painting queue to squeeze them into my March For Macrage goal for the month of March. 

I'm not going to do a full step-by-step painting guide for these guys as I have established that recipe in many posts already, but the cameoline cloak is a definite exception. I got these steps from issue 63 of Imperium Magazine.


The basecoat for the cloak is done by using Mechanicus Standard Grey. After that all of the cloak is wash with Nuln Oil.


After that Dawnstone is layer on top but leaving the recesses exposed. 


Then I draw vague geometric shapes all over it using Mechanicus Standard Grey. I noticed that my patterns were not nearly as dark as the examples in Imperium Magazine, and I found that I had to paint on two more coats over my pattern as well as an additional Nuln Oil layer to get it anywhere near dark enough for my satisfaction. After that I added another serious of geometric patterns but this time using Administratum Grey


I was able to finish these guys on March 29th. And I was quite happy with the results. 


The glow on the binoculars was also taken from Imperium Magazine (issue 65). I thought it look different enough to give it a go. Mephiston Red for the basecoat followed by a Nuln Oil wash them Mephiston Red again. Then the highlights were using in smaller coats starting with Evil Sunz Scarlet, Troll Slayer Orange and a final edge highlight of Yriel Yellow.


The Sergeant decal was a real pain to apply. Not sure what happened but the top of it tried to disintegrate. Thankfully, and if you build this guy also I recommend this highly, I put the decal on before I attached the cloak. It ever so slightly covers the top of the decal which mostly hides my calamitous mistake. 


All-in-all, I thinknthese guys turned out well. So much so that I think I want to revist my old Sniper Scouts and apply this same technique to them. 


Alright, that's a wrap, but before March ended I was able to squeeze out one more painted model that will perfectly accompany this squad. But I'm saving that one for it's own post also. 


Saturday, March 30, 2024

March For Macrage '24 (Part 3)

 My personal March For Macragge challenge has been completed! Behold, Brother Jay the Third Company Primaris Ancient! 

The finished Ancient. 

Finishing this guy was fun, but just like Da Masta Cheef recently stated when he painted up his second version of this model, he's got a lot of decals on him! 


The base model has four decals. I put one on his left hip plate only when I realized it was a bit too large to fit one of the banner squares I had hoped to put it on. 


Applying the decal onto his left pauldron was a real challenge. The left side nozzle almost touches the pauldron and it looks like the gap is big enough to slide a decal between, but, not really. I was persistent though and some how got it to work. 


Ok,  now let's discuss this banner: 

I decided to paint the border and the backside of the banner red to represent the third company. I had the idea to use a really old decal, from one of my first decal sheets from way back in the Rogue Trader days of 1989. It's red and I thought it would pop out best against a white background. 

Decals.

The rest of this was fairly straightforward. I opted to use yellow on the shield  emblem on the banner as I like the way it contrasts without clashing too harshly against the rest of the colors. 
 
done without decals.

I used seven decals on this thing. The most odd was the scroll on the lower right. I cut up some of the copyright indicia fro. the bottom of one of the decal sheets from was using and scrambled up the words. I kind of wanted it to say nothing g but give the illusion of importance. Not unlike the Deathwatch shoulder pads in that sense.  

Done with decals. 

The decal for the main icon was a bit yellowed with age so I tried to cover some of that up with White Scar. I left a little bit showing  close to the icon because I think it gives off an odd optical effect, a bit like a glow. 

Once that was done I stuck the banner onto the guy. 


Over all, I think I'm fairly pleased with the results. 


I really think that beakie helm turned out great on this model. I wish I had the idea sooner, I would have put beakie helms on all of my Ultramarines . However he will have to do as a lone reminder of the past glorious days.

Speaking of which, the Tau skull and helms at his feet are an homage to Da Masta Cheef's Tau, even though my Ultramarines have yet to face them, I feel it might be inevitable. 

The same night I finished this guy, I also finished another small squad that I managed to cram into March of Macrage. I think they deserve their own post however so look for that soon.