 |
| Magnetized to terrorize. |
In my last post regarding the
Reavers of the Obsidian Rose (part 3), I talked about magnetizing these jetbikes for easier storage. I wanted something that wouldn't be a customizing nightmare or take an agonizing amount of time. At first I found some customizing tips
using a screw, but with some of my models already painted I feel this would be a disaster to attempt.
Warfrog has some amazing flight stands that he uses with his Eldar but apparently the company that makes those has stopped producing them.
Shopping around online I found a vender that I thought may do the trick:
The Magnet Baron. His catch-phrase is:
Your DIY Super Magnetic Home. Seems like a tall claim, but after perusing the site, I was impressed enough to try it out.
 |
| "Your DIY Super Magnetic Home."* |
The magnets I chose were the Medium ones. It was easy to choose as the Baron, wisely, used GW models for scaling purposes. I ordered 3 sets, enough to do all of my Reavers and with a few left over. And I waited.
 |
| My chosen selection.* |
Shipping was fairly quick and the package even arrived sooner than promised, which is always a small victory, yes? And here is what each kit has.
 |
| 4 ball bearings, rods, and indented magnet and 8 flat magnets. |
However no base was provided which is understandable as it is assumed that you are buying this kit to replace the rod for your kit's provided flying stand. But it is something to be aware of. Also, beware that there is no instructions provided, or on his site, so unless you're great at puzzles or just highly intuitive, be ready to correspond with the Baron like I did. I asked his lordship** for instructions and this is what he relayed back to me:
"for every rod there should be 2 flat magnets a ball bearing and a indented magnet. One flat goes on the models base. one goes on the bottom of the rod. the indented magnet goes on the model. The ball bearing goes in the indention on the rod."
I decided that I did not want to glue the two flat magnets to the base as I will not need this for storage purposes. Although in hindsigbt this does give the base a bit more weight so there is an added bonus for doing this other than making the rod detachable from the base. So, let's get to it then: First I glued the rod to the base using plastic cement.
 |
| Rod glued to base. |
Next I added the ball bearing to the rod. Note that one of the rod is concaved so that the ball bearing fits perfectly when super-glued in.
 |
| Ball bearing attached. |
Ran into a slight snag with the concaved magnets as one broke when I attempted to seperate it from it's family. I think I can fix it with superglue but we'll see.
 |
| The damaged concave magnet. |
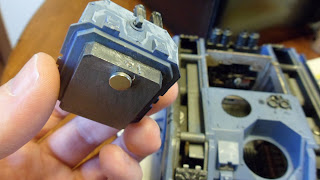
Next I glued a concave magnet to the bottom of my model.
 |
| Concave magnet attached. |
And presto: the model is done!
 |
| Done! Stable and balanced. |
The ball mount allows you to make model poseable if you choose, which is a really cool bonus. The bikes seem to be a bit higher that I had anticipated, but I am OK with this. Additional bikes may be lowered by just cutting a 1/2" or so off the stand's bottom.
 |
| Zooming upward! |
I am trying to decide if I want to paint the magnet or not. Since the ball bearing can not be painted after it is mounted, the whole point may be moot.
 |
| Angled down to straff ground targets. |
Over-all I am pleased. It beats customizing my own and is also faster. I like the added bonus of being able to swivel the models as this was not a goal when I set out on magnetizing these things. Also I'm pleased with my first purchase from the Magnet Baron and I will likely use him again. My only criticism is the lack of included instructions or guidelines. For that I give him a 'B-' grade instead of an A- grade for this product and for quick communication.
*These images are from Magnetbaron.com, used here for review purposes only.
**Just in case the Baron is truly a Royal (and not just a cool and catchy business name) I felt it safest to address him as such to avoid any disrespect.


