Showing posts with label Tyranids. Show all posts

Monday, May 05, 2025

Swarmlord (Part 2)

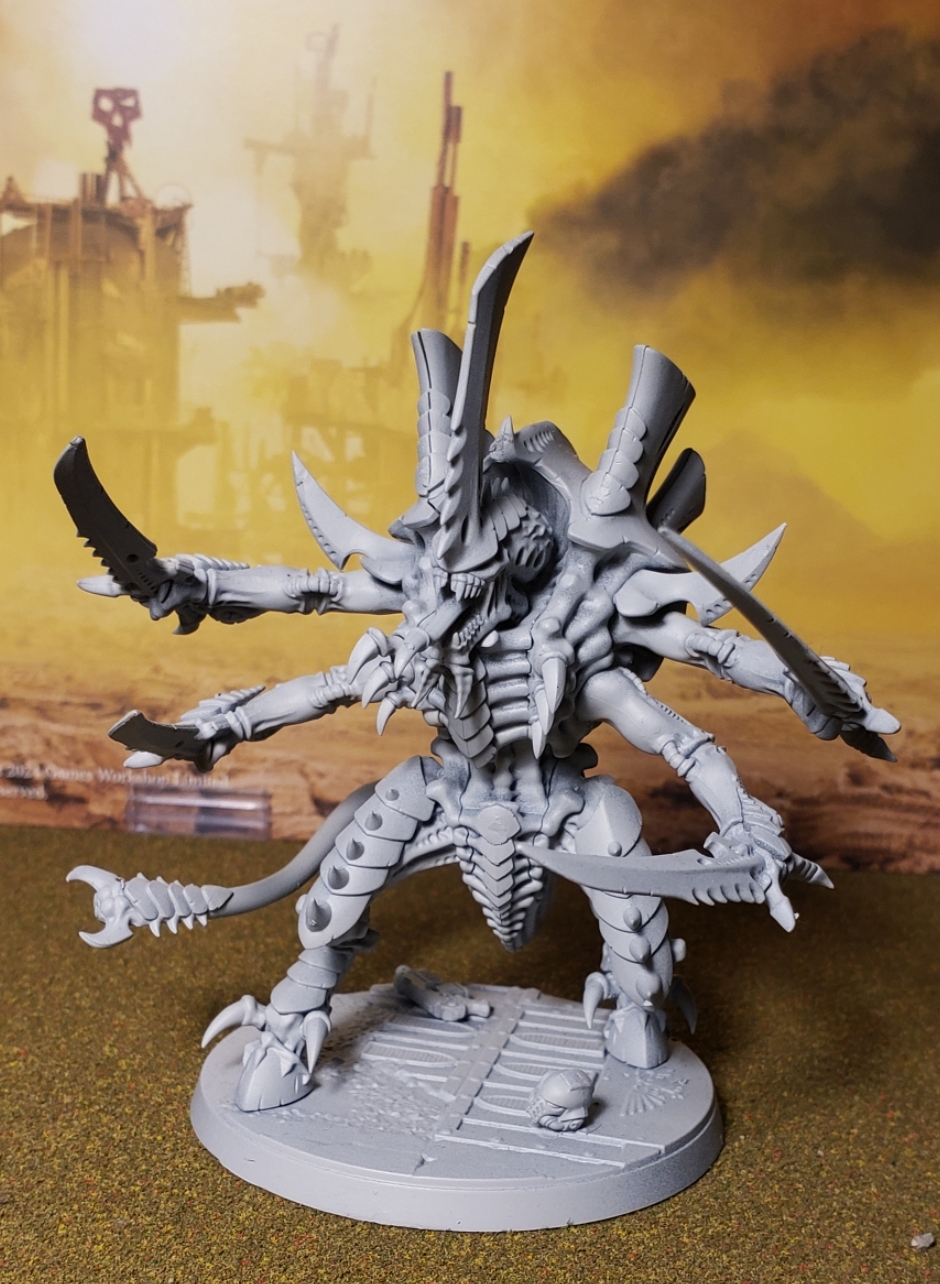
 It's been a while since I posted Part 1 of this saga of the Swarmlord, but the desire to throw paint on him can no longer be restrained. That, and I wanted a break from my recent Old World focus.  Don't get me wrong, I am loving all that fantasy stuff after so many years away from it, but I was having fun working on the nids a few years ago and was recently feeling a bit bummed that I didn't finish this army. 

Primed.

So I decided to do something about it. 

I basecoated the model using Contrast Paints (Luxion Purple, Ultramarines Blue, and Skeleton Horde), Chaos Black Citadel Color and Applebarrel Indian Red. A lot of my color choices are somewhat in line with the choices I made on Old One Eye  awhile back as well as my original Screamer Killer model. 

Basecoated.

For the swords (including the one growing out of his head) I applied a thinned Khorne Red along the edges. 

Khorne Red blades. 

And so far, he is looking pretty much battle-ready.  But I'm not going to settle for just that, so stay tuned for the next steps


Thursday, May 16, 2024

Spore Mines (Part 1)

 After my recent game/schooling by Warfrog and his Tyranids, he gifted me some spare bug stuff. One of those was an assortment of the new style Spore Mines. I really like the new, bigger, size and whoever sculpted these things really captured their floaty vibe by the way the tentacles are posed. They're also considerably larger than their previous incarnations. 


I got these things painted up ro a battle-ready standard by using contrast paints. Xereus Purple and Ultramarines Blue were the two main colors and I used Bloodletter to wash over the weird flesh membrane looking thing that's the core of the mine.  And that's really it. And the Contrast Paints make for a good quick multi-tone look that I'm satisfied with. And of course I can revisit these again later to paint them up to my Parade Standard. 

There are three different poses, and here they are; 


I have more of these things (he gave me about 15 or so) but this is a good start.  I'll say it again, I think the Contrast Paints do a great job getting these things into a table-worthy state, and they will hold up well enough until I can turn my attention back on to them. Which, with all the real-life stuff I got going on, will be a while down the road. So don't hold your breath for Part 2! 

Monday, April 15, 2024

Genestealer Brood #2 (Part 1)

 I did not need to build these guys. I have a lot of Genestealers, more than I can currently field in a game, but I wanted a unit that looked very different from the other painted unit. The first unit, or if you prefer brood, that I painted started off life as a kill team intended to be used in one of the older iterations of the Kill Team game. But this brood I wanted to build using the scything talons and extended carapace, two options and biomorphs that have been saddly dropped from their rules. 

The brood of 8. 

Just like the last two batches of termagants, I painted these up to a battle-ready standard as I don't currently want to invest the time in them to get them up to my parade-ready standard. I will in time, just not yet. I did this by using mostly Contrast Paint with exception to just the extended carapace which was basecoated using Abaddon Black


I wanted these guys to look like the hivemind was actively adapting with guys, thus the variety of biomorphs and strange heads. Even though the game hardly supports these concepts on the tabletop. 


The first half of these guys I put together using their basic hands, as that's traditionally how they're built. However the assembly instructions that I got showed them using  the clawed hands with the scytjing talons that I thought looked really dynamic. So I built the second half using that look. 


Those of you that can count will have no doubt noticed that this is just a brood of eight models and Genestealers are now fielded in units of 5 - 10 models. I have one finished model that will join with these fiends, despite his lack of biomorphs. The poor guy has been through hell since he was first finished so it will be nice to give him some chums to run with. I just need to find one more model of this style genestealer purestrain to complete the brood...

Monday, March 25, 2024

Who Hunts Who?


Bug Hunters. 

This is more of a Battle Summary than it is a Battle Report. The reason for this is that this is Warfrog's second game of 10th edition and we were trying to take a deep dive into the rules and try to make a study of some of the aspects that felt to us a bit like grey areas. Where I have played more games of 10th I was able to point out some of the differences from previous editions and he was able to show me some things I was unaware were changes that haven't come up in the games I've played thus far. it was a good learning experience and a fun challenge also. So we whipped up a pair of 1000 point lists and got together to see what mayhem we could cause. 

The Bugs of Doom. 

If you want to play big things that hit like a runaway truck and only have to keep up with a few rules, this is one way to do it. We have a Norn Emisary, a pair of Exocrines, a Biovore, a Maleceptor, a Haruspex and the leader of this gang of critters, the Parasite of Mortrex. 

The Deathwatch of Neverness. 

I brought the Inquistion's favorite, so-called, alien hunters: the Deathwatch. I, stubborn cuss that I am, steadfastly refuse to give up on the Deathwarch. My previous game with them was a humbling situation, but I blame that more on my horrendous dice rolling than I do the rules for this army. They're led by a Chaplain attached to a 5-man Veteran Squad, three DW Terminators squads and 6-mai unit of DW Bikers. And I thought I was being cheesey...


We played Dawn of War set up, with Scramblers and Purge the Unclean as our rules and mission. 

One of the rules I wanted to figure out was Rapid Ingress using the teleport homers to bring in the Deathwatch Terminators. I only brought in a single squad on Turn 1 to try to hurt the Norn Emissary. Luckily it had Advance during it's movement phase and didn't unleash psychic hell on them when they showed up after it moved. I was able to move and dump a lot of fire power on it, well I would have if the 3D3 roll had allowed me more than 3 shots. The ability to now declare Oath Of Moment is a stark contrast to the last time I played the Deathwatch and it really improved my ability to shoot. However having 11 Toughness really makes this thing a challenge to take down, as well as it's FNP saves. Over the two Fight Phases of being stuck in melee with this thing, the Terminators would be defeated with only a few wounds inflicted upon the Norn Emissary. 

Start of Deathwatch Turn 1. 

During Turn One I had the genius idea (add sarcasm) to charge the Haruspex. This was a result of my ignorance regarding the Haruspex as I honestly knew nothing about it. A lesson I failed to learn from the previous game using these bikes is that I really don't need to be charging with them. Sure, the Long Vigil Close Combat Weapons are decent, but these things are just better at zipping around shooting stuff than they are trying to slice and dice their foes. This first Fight phase the Haruspex killed two bikes. I knew it was tough, but bad dice rolls happen. On the 2nd Fight Phase during Warfrog's 2nd Turn, the Haruspex stompled, crush, slammed, bit, torn and devoured all the remaining bikers. it was both glorious and terrorfying at the same time. 


Also during Turn Two, the DW Vets were killed off leaving just the Chaplain who now found himself locked in combat with the Parasite of Mortrex. He took three Wounds during that fight, and came very close to taking out the Parasite. On Turn Three the Chaplain almost did it too but his prayers and litanies failed to produce the results he had hoped to leaving the beastie alive with a single Wound. On Turn 4 the loyal Maleceptor wou;d bound over to his leader's aid and finish of the Chaplain for him. It was a glorious last stand, and a grand achievement for the Tyranids who had Assassinate at a Secondary Objective. 

Going for the glory!

Remembering to bring the rest of the Terminators in on the 3rd Turn, I tried to go for the Behind Enemy Lines Objective. Mainly to stop the biovore from tossing around more Spore Mines. (The bastard was plopping Spore Mines on to objectives and as rules are currently written we could not find anything clarifying or stating that Sporemines can't full-fill secondaries (such as Cleanse in this instance) or hold objectives). Gotta love it! Anyway,  the Terminators arrived and dumped fire power into the Haruspex, seriously hurting it. It Charged into the closest Terminators on it's next turn, killed a few of them before getting killed itself. That squard charged the Biovore on the next turn, killing it. The other Terminator squad got to work on the Exocrines. 

Terminators vs Exocrines. 

Or was it the other way? After the Terminators fired on the Haruspex, on the following Turn the two Exocrines unleashed a hail of shots into the Terminators picking off a few of them. They moved onto the closest Exocrine, pumping shots into it before charging the Exocrine and taking a few Wound off of it. On the next Turn the engaged Exocrine fell back so the other one could fire and charge. That Exocrine got the Terminator down to just the last pair who put even more damage on this one. Finally, on Turn 5 this Exocrine fell back and the Norn Emissary charged up and finished them off. Yeah, they didn't kill anything, but they sure put some hurt on those monsters. Impressive though that may seem, hurt doesn't equate to winning. And the Terminator's bio-mass was now being consumed. 

The final move. 

Finally the last group of Terminator killed off the Spore Mine (why they don't explode when shot is a mystery to us) and took an objective. Our final score ended up being 70 to 30 with the a solid win for the Tyranids. Most of the Deathwatch's points where accrued in the final rounds of the game. So what could I have done better? I had to hold onto the main objective but maybe I should've taken better advantage of the terrain during the set-up phase of the game so the Veterans wouldn't be so easily targeted. And I was bit too bold with the bikers and the first squad of Terminators. With a force as small as this, I really need to be a lot more focused with my assets when it comes to targeting and objective acquisition. Also dice happen, but really, I can only control what I can control. 

Deathwatch are not an easy army to run despite their appearance as a take-on-all-comers list, they really can't in my current opinion. Not currently in this edition. Oath of Moment was a huge help, without it they likely would've been tabled. 

I'm still not ready to give these guys up yet for 10th, even though they are woefully in need of help in this edition; just some pruce reductions at the least  would help them. They lost a lot of fun options between 9th and 10th, and their weapon options where made woefully generic (simplified not simple!). A force this small and niche needs to have a "sticky objectives" option somewhere, that is one way to fix them. I spent the early morning hours seeking advice from a vampire, ("Games-Workshop does not support Deathwatch; I do!") so who knows, maybe I did learn more about them through this experience? It maybe a good while before I try them out again though. 

The Tyranids on the other hand, I think my biggest take away is that I need to bite the damn bullet and somehow obtain a copy of their codex. Playing them without all of the Stratagems available has definitely been a handicap. However, despite the wonderful gift of a few bugs from Warfrog (Thanks again man!) I will not be expanding my hivefleet beyond what I already have done last year. That's mostly a budget thing, at least for the immediate future. Staying on top of the FAQs is something I need to get better at also so that I can be aware of changes  (the ruling that Devastating Wounds no longer cause Mortal Wounds) that dramatically effect things like the Norn Emissary. 

Thanks again to Warfrog for hosting this game and for the extra goodies!


Tuesday, March 19, 2024

Metal Winged Hive Tyrant (Part 1)

 Yeah. I have a metal winged Hive Tyrant. Well, the wings are not metal. In fact, I'm pretty sure the wings aren't even from a GW product, but I suspect they're from an old McFarlane dragon toy.  I have never confirmed this however. Regardless I think it looks cool. I got this of. Of ebay before the current Hive Tyrant was released. Back in those frontier times one had to convert wings onto their metal Hive Tyrant models if they wanted one. Usually folks used either the plastic dragon wings that most of the WHFB dragons all used or the LotR Balrog wings. 

Target Alpha, Codename: Flappy. 

The mad genius who put this model together was seriously into magnets. To this day I'm astounded by what this person accomplished on this thing. A series of perfectly polarly aligned magnets dot the back of this model and connect to the piece that the wings are attached to. The arms are all attachable with magnets also. The builder of this thing must have drilled into the model to allow the magnets to sit so perfectly in them. 

Magnet madness.

For reasons that confound me he even drilled into the upper half of the model and built a base on the lower half for the magnets to connect so perfectly. I think transportability was the inspiration behind a lot of these choices. Despite all the greenstuff and other steps used to secure this model, his tail broke off when I moved back in 2014. 

Bug bisected.

Despite all the magnetization and the inherant potential to be able to swap weapons, this critter only came with one loadout, which was the Venom Cannon. And for reasons I don't recall, I simply never acquired the other weapons. Until recently when Mrs. Neverness gave me the gift of the Swarmlord kit. 

New weapons, new choices. 

Now I have the additional weapons and I have attached the magnets to them, I am ready to move forward with this project. (Although figuring out storage is still proving to be a challenge). 

"...help..."

As I was ooh-ing, and ah-ing over this model, while attempting to figure how to paint it, I felt it needed the requisite dead foe bit somewhere on it. I had a left over Sergeant hand from the Assault Intercessors kit and I thought it would be amusing to have it poking out of the rubble in all it's futility.  It, no doubt, belonging to the crushed marine under the collapsed floor or wall that this Hive Tyrant now poses on.

For now this Hive Tyrant will join the queue alongside the Swarmlord (and few other friends).  I hope to be able to paint both of these big miniatures together but we'll see how things in my "real life" shake out. 


Sunday, February 18, 2024

Sites of Power


Battle Royale. 

Once again Da Masta Cheef and I gathered for a 28mm heroic scaled tussle at the Outpost. 1250 points on each side. I continued to see what I could do with the Tyranids and this time he brought Orks. I decided to mix it up a bit. I swapped the Winged Hive Tyrant out for a Swarmlord. I swapped out some termagants for some Zoanthropes and barbgaunts. This seems like it could be a decent force to throw down with. 

The Tyranids gather. 

Da Masta Cheef brought Da Masta Cheef. A fella that hasn't appeared on this blog in years. Mostly because he sold the original model. But, as fate would have it, Rob/Murl gifted him recently with another of the same model and,  bonus,  it was already painted. 

Da Waaagh of Da Masta Cheef!

We tend to build our board out before we select our missions. It's just more fun to do, and then we might tweak it a bit afterwards. Today we decided to fight over a ruined forgeworld. 

Human ruins make the best xenos playgrounds. 

Da roolz for dis fight are: 

Hammer and Anvil Deployment, Scrambler Fields and Sites of Power. 


This deployment suited out armies well, and deployment went without a problem for either of us. 

Tyranid deployment (Right flank).

Tyranid deployment (left flank)

Ork deployment. 

The Orks went first.  It was noisy and loud but in the end the Tyranids lost only a few models, but one of those, quite painfully, was a Zoanthrope to the well aimed shot from the ork bubblechucka. The Tyranids surged forward and like-wise did little damage to the orks. The Zoanthropes eliminated one of the Nobs from Da Masta Cheef's retinue, an insult he would not soon forget. The Screamer Killer, laughably, missed all six of his shots! 

End of turn 1

Turn 2 and it was time to crank up the heat. The arrival of the ork dive bomba did just that as he dropped a bomb on the Swarmlord and inflicted him with 5 Mortal Wounds! 


Bombs away!

The Kommandos arrived in style in my back field and wiped out a brood of Termagants (the one's with the brains on their backs).  Leaving the Rippers sitting on the objective exposed to a potential charge. 

There was another squad of Termagants here.

Another fight broke out as the termagants that had a toe on an objective was charged by a Boyz squad led by a bad-ass nob. 


Tyranids Turn 2, and I opened up everything that could shoot at the ork Dive Bomba. It's ability to drop Mortal Wounds was too much of a threat to leave it unchecked, however the combined assault left it smoking but  still very much a threat. 

I had a brood of Genestealers assault the Kommandos, however Da Masta Cheef wisely played the Stratagems "orks are never beaten" and "unbridled carnage" to allow them to fight back after their elimination. And they took out half of the Genestealer brood! 

Kommandos and Genestealers bloodbath.

The other of brood of Genestealers on the opposite flank charged a Boyz squad wiping them but sparing the attached character. That guy was a banna waver . And that banna is a bad-ass weapon and it was used to beat the bioengineered snot out a handful of purestrains. Much to our mutual surprise! 

Yell loud and carry a really big stick.

The Swarmlord and Screamer Killer charge the orks hold and objective and totally overkilled that unit. But now they were exposed...

Turn 3, and all the ork guns were trained (or vaguely pointed at) the Tyranid monsters that were on the threshold of storming the ork lines. However the Bubblechucka, again , showed it's worth as Da Masta Cheef rolled a '6' on it's chart which resulted in a Dense Bubble. That was more than enough to destroy the Swarmlord! 

Imagine a dense bubble enveloping the Swarmlord.

The Deffdred (that's the baby squiggoth) and the nob mob along with Da Masta Cheef, charged into the Screamer Killer which is felled by the overwhelming onslaught. 

Dies screaming. 

After killing off the Banna Waver in the Orks turn, the Genestealers charged the Deff Dred/Squiggoth on their turn 3. They were actually successful in tearing it up, but it was still alive and kicking, locking the Genestealers in combat. 

Bring it down! 

On the other side of the board, the Genestealers who had previously tussled with the Kommandos now set their sights on a Boyz mob that was in their way of an objective, only to have that squad's nob survive their onslaught but also kill a few stealers back in return, thus halting the bug-eyez advance! 

"Oy, you can't go on!"

Cheef's turn 4 and the dive bomber returned to cause more havoc. It threw its bomb and bullets into the barbgaunts, eliminating them.

Buzz bomb is back! 

Da Masta Cheef wanted in on the tussle so he and the Boyz wet after the Genestealers that wuz locked in combat with the deff dred/Squiggoth. All of the purestrains were killed but the Broodlord remained. On my go in this Fight Phase I decided to throw everything into the Deff Dred/Squiggoth in the hopes that it would blow up. And although it was destroyed, it failed to blow up. In fact, nothing in this game had a Dead Demise, which is disappointing. 

Broodlord kabobs tonight! 

The Nob was joined by another mob of Boyz who managed to wipe out the Genestealers, that nob was killed however. But now the orks had the so-called Doom in their sights, as well as the last stand of Rippers. 

Dibs on da balloon! 


And we called it here. The nids were not going to survive the war of artiiton, clearly, but by this point the orks were not going to  be caught in the points games either. Final tallied points was 10 to the Tyranids, and 26 to the Orks! Waaargh to Da Masta Cheef, 'e's back!!!! Waaaaaaagh!

It was another fun game. That damn dive bomba really messed up my plans, and although I had some bad dice rolling it wasn't as bad as some of the games I've recently had. I think the MVP of the whole game has to be that Bubblechucka. I am now enthusiastic about building mine and playing orks in this edition. Their rules seem well suited for this edition, where I'm still very much struggling to get a grip on the nids. And this edition in general. I am still 0-4, where Da Masta Cheef remains undefeated...


Monday, February 12, 2024

Doom of Malan'tai and Zoanthrope Friends (Part 2)


Doomy & Co.

After a recent game using the Tyranids, I recognized the need for a bit more variety in my fledgling invasion fleet.  So I decided to get on with my plan to assemble these very old 3rd edition era Zoanthropes as outlined in part one of this series.  

Pinvise blues. 

As some people might be rediscovering with the revival of Warhammer Fantasy Battle in the form of The Old World and the relaunch of a bunch of metal miniatures to support it, a lot of multipart metal miniatures require drilling and pinning. This is the technique of taking a pinvise or suitable drill to bore holes in two pieces and filling those voids with a connector, usually a brass rod or a wire, and superglue it all together.  Doing this makes the bond a lot stronger and hopefully the model won't fall apart on you later. I find the whole process to be a pain in the ass and I quickly found that I didn't miss it. But two of these models absolutely required it. 

The Doom! 

The Neurothrope,  that I like to think as my own lil' Doom Of Malan'tai came out as I had hoped. In fact I think he looks awesome. I actually thought that the 2nd edition Zoanthrope head was bigger than this but I am happy with it regardless.  Anyway, he looks cool with his buddies. 

The assembled Zoanthropes. 

At this point I kept seeing mold lines on the two 3rd edition miniatures, so before I added battlefield debris and other features for their bases I kept attempting to file down those lines. 

Primed and paint ready. 

Satisfied with those efforts I gritted up their bases. Since they're kind of a showcase sort of unit, I added the required skulls, helms, body parts and weapons to complete their look. Of course the Doom had Eldar parts since according to his bio that's his favorite snack.

These guys will now go into the queue. Some of you might know this, but I am having a surgery soon  (at the time of this writing, now set, a bit ironically, for Valentines Day) and I am preparing models to paint while I recover. Hopefully I can actually do that, but we'll see, as it will depend on how I'm feeling...