Saturday, February 03, 2018

The Daemons of Neverness (an intro).

Greetings. As hinted at in my 2017 year-end -review, I plan (and/or hope) on making Chaos Daemons a focus this year. I will be starting with Slaanesh, or rather continuing on from the work I did last year (see Daemonettes-part-2 and The Return of She Who Milks part 4). But more on that in a bit. First, I wanted to take this time to look over the totality of my Chaos Daemon collection. It is a rather strange collection spanning decades, and game editions.

My collection started with Nurgle, a history I discussed before when I showcased my old Deathguard models. These daemons were part of that collection, and the standout (because tbey came to me already painted) models are these Nurgling bases and Beast of Nurgle. These are the origional Rogue Trader/ Lost and the Damned miniatures. The Beast of Nurgle, in my opinion, is the still the best version GW has ever produced. The mid '90s versions were just pathetic, the '00s version was just...ugh. But the newly released plastic kit is very good however and I think I just might get one. Or two.

The Original Nurgle's Rot.
The plague continued on into the '90s with the collection of a unit of Plaguebearers. I found that the RT era and 2nd ed minis mixed well together. Both eras had the "Alfred E. Newman" smiles and the large feet. I hated the 3rd version with the fork tooth swords and melted features. The new plastics are great and I have some of them as well as these old pewter guys.

"What? Me rot?"
These are the original Flamers of Tzeentch, except for one guy who is actually an old Tzeentchian Renagade Marine. The Rogue Trader era Tzeentch Chaos Renegades were extremely mutated with many of them having fungal bodies like the flamers do. They all became redundant in the mid '90s with the arrival of the 2nd ed Chaos Codex. With that book's expanded lore eliminating them once and for all thanks to Arhiman's Rubric spell. So, this lonely model ended up fitting in fairly well with these old Flamers.

The Flaming Shrooms.

Up next is the unit of beasts and I am looking forward to completing them soon. They are the original Fiends of Slaanesh. They are going to take a lot of work to get them done the way I visualise them turning out, but I think I can pull it off. More on them soon (ish).

Fiends of Slaanesh.

There is a lot happening in this next pic. Starting from the top left corner we have a disassembled Palanquin of Nurgle,  the Beast of Nurgle with Nurglings, and a few of the original Bloodletters. Next row we have the 10 plaguesbearers featured above. Row 3 have the Flamers of Tzeentch and Brimstone Horrors. Row 4 starts with the moon-headed sorcerer on disk, an original Great Unclean One (Giggles the Rotter) and finally a bunch of Pink Horrors of Tzeentch.

The denizens of the warp - in one box!

Assembled here are two of the plastic Daemonettes boxed sets which I started to assemble in late summer of 2017 and finally finished in December of 2017. This will likely be the first of everything here that I will paint in 2018. So more on them when they get their own posts.

The Daemonettes, waiting for their paint.
Here are some of my unopened blister packs and box sets. Starting with four Seekers of Slaanesh. These are the brilliant and highly coveted Juan Diez sculpts. I am still trying to decide if I am really going to open and paint these or save them for my son's college fund... and yes, I do have a fifth model somewhere that I bought loose on ebay.

The highly sought after seekers.
Here are most of the boxed sets I have yet to build.  Bloodletters,, the Tzeentch Flaming Chariot,  plastic Blue Horrors, the late '90s metal Keeper of Secrets, Juan Diez Daemonettes, plastic Seekers of Slaanesh, and Two Cannons of Khorne on each side of the late '90s Great Unclean One.

Boxed Chaos.
Here is a rarity: the pewter-cast Changer of Ways. Tbis is when they repackaged him and renamed him the Lord of Change for the early '90s distribution in the U.S. He is joined in this pic by two of the plastic Pink Horrors from the Silver Tower Warhammer Quest game.

Old Changer of Ways and new Pink Horrors.
More blisters! The green packs are all Blue Horrors. The red packs are Chaos Spawn and the black packs are the special characters Skulltaker and The Masque.

Horrors, spawns and characters.
Nurglings! These packs of mixed nurglings that span across each and every incarnation they have had in metal. I completely prefer the current plastics as far as bases of Nurglings are concerned, so these will likely end up scattered across my Nurgle miniatures as base adornments or riding on vehicles or something.

Nurglings!
And here we have Daemon Princes.

Prince of the (warp) universe.

Azazel is going to be a Slaaneshi Daemon Prince of course. The other guy....well, I sort of forgot I had him. I do think I orginally was going to paint him up as an Emperor's Children Daemon Prince, but I think he might just be a Black Legion one instead. Even though my Khorne Daemon Prince is wearing Black Legion armor already, but that probably doesn't matter. I have time to think about this further I think...

Finally, I got these recently, and I think they will give the whole army quite a bit more muscle and options. They should round out the force rather well and the Khorne set in particular will give my force three skull cannons.

Fodder for the fodder gods.
It will be interesting to see just how far I can get with all this, and hopefully it will also be fun as well.

Wednesday, January 31, 2018

Celestial Lions Land Speeder (Part 2)

After many months of neglect, time was ripe to turn my attention back to the Celestial Lions Land Speeder. I must confess that I sorta forgot about this model. But when looking through my 2017 posts for my year end review, this caught my attention again. And my imagination, as I still think this would be a fun thing to include in my Kill Team games.

After assembly, of course.

After far too much contemplation regarding the undercarriage gravplates, I chose to just make them a darker metallic color. The gold kind of shines through creating this weird tonal effect that I like.
The grav plates.

I worked on the interior next, if you can call the crew compartment of an open topped vehicle like this an "interior". I made the buttons and switches an assortment of colors, as the rules of old school sci-fi dictates. I used Dark Reaper on the seats, which amused me a bit because it reminded me of the seats in a car I used to own. Granted my car didn't have docking ports for power armor, but then the idea of Space Marines chill'n in a comfortable ride makes me grin. After all, there is no way they could actually feel that comfort through that power armor, right?

They don't recline, but they are heated.
Satisfied with things at this stage I turned my attention to the rear jet exhausts section of the speeder. I painted it in a few tones of metallic using Bolt Gun metal and Nuln Oil.

Ready to assemble the hull. 

Everything regarding the main body of this thing was ready to be assembled. You may have heard the tales of woe regarding this original Land Speeder's challenging assembly. Really, you just need Plastic Cement, patience, and lots of rubber bands.
No such thing as too many rubber bands.
And this is where we leave off for now, with this model banded up and the glue curing.


Saturday, January 27, 2018

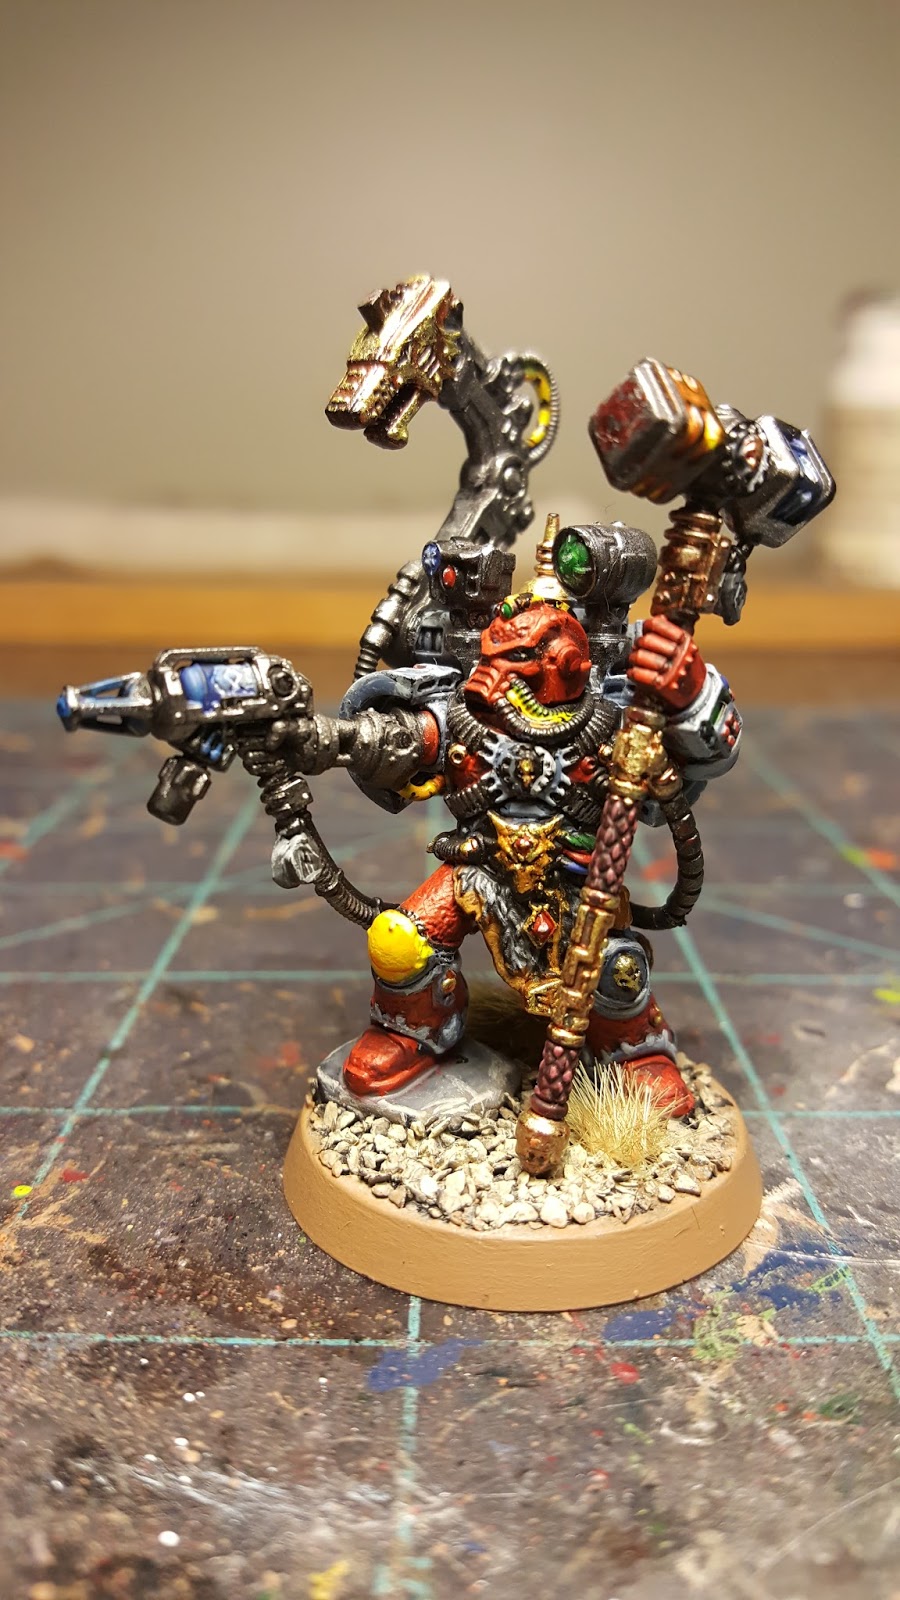
Space Wolves Iron Priest (Part 3)

With the icon drawn on the yellow knee guard, and few minor touch-ups, I declare this model done!. Time for some natural lighting shots, outside in the moss patch:

Iron Priest in natural lighting.
Again, this was a very challenging miniature to paint. And I originally thought I could knock this out in a few days? Hahaba! Hell no! Still, I am very satisfied with the end result even though my decision to embrace Mars Red on an Iron Priest may be slightly controversial to the fluff police.

So much stuff to freeze with my icicle gun.

I drew the knee icon on with a micron pen. It took me a few attempts until I settled on this one as "close enough."


Still working on a name for this guy. Keen-eyed readers of this blog might have spotted the name Iron Prieat Wotton over on the Rogues Gallery page. That is name of my original, metal, Iron Priest whom I have yet to paint. But finishing this guy has inspried me to put him into the queue so he may one day make an appearance.

Ageir Ironjaw the Iron Priest is the name I am leaning towards for this guy at the moment, but I could be influenced to change that (no, not gonna name him Lager, sorry Cheef ).


Wednesday, January 24, 2018

Space Wolves Iron Priest (Part 2)

I have dabbled off an on, here and there,  on this miniature since I posted part-1. Not enough I thought to justify a "part 2" at any of those times, but finally I think we have arrived at that point. In fact, after a new hours of concentration, he is all but done.

The assembled Iron Priest.
I feel like this was the hardest single miniature I have ever painted. This model is practically over-loaded with details. I don't know how someone could assemble him first and expect to reach all the details when painting it.

Backpack and head attached.

Granted, I made things harder on myself by chosing to make him predominately red with Space Wolf gray and yellow details instead of just Space Wolf grey like all the example GW have presented, but even then,  this would still be a challenging model to paint. During the course of assembly I was applying touch-ups to the paint job that I knew I wouldn't be able to reach later.

Gun arm attached.
The model fits together well, but it is still something of a puzzle. I suggest putting the backpack on first as everything else attaches to it. Then the gun arm followed by the shoulder pad that goes on it. I made the mistake of putting the shoulder pad on last which ment I had to maneuver it past the hydraulic claw arm and cables while the pad was wet with glue. I pulled off this feat, but had I put the pad on first it would have been less stressful.

Rear details.
A lot of the rear details get obscured or covered up when the left arm and hydraulic claw arm arm attached. I made sure to put my Space Wolf decal on prior to the final assembly.

Assembled.

And here he is, assembed! To think, I thought I could do this in less than a fortnight! It's probably possible for me to do but I would have to have been a total hermit to make it work.

Stay frosty.
The frost gun and the hammer's frosty bits both have these ice runes that are another insane detail the sadistic sculptors added. These were a challenging detail to paint also as I kept screwing them up until I was finally satisfied with them. I think I have worked out a better solution for handling it, in case I encounter this sort of detail on another model.

Still one thing left to do...

The only thing left to do is draw a Space Wolf badge onto his yellow knee guard. But I was too tired to do that so I will have to continue that in Part 3. And I could not find a Space Wolf decal small enough for it either. Which is weird as other chapters have them, but whatever.

And a name, got to come up with an appropriate name.... (Yellow Knee the Technician has already been rejected).

See you in Part 3.


Sunday, January 21, 2018

The Snowy Ruins (Part 3).

After an afternoon of what felt like frenzied drybrushing dedicated to the pursuit of completing this ruin, I have these results to show for it.

Pass thru this egress, assuming you can open it.

And here is the final piece:

Nearly birds-eye view.

It went so quick that I didn't take many 'work in progress' pics until nearly the end.

Patina and Rust.

I drybrushed Patina over the entire model.

Patina coat.

Then I picked out the areas that were clearly metal support structures and painted them with Indian Red which is sort of a terracotta color. These were Function vs. Form features such as I-beams, plates, wall sections etc. and I wanted their rust to contrast from the patina/copper look of the rest of the model.

The old roof. 
I then light drybrushed on Apple Barrel Cloudless on the raised areas of the Patina colored areas.

Cloudless layer.

All the hatches, vents, control panels and consoles,  as well as hinges and latches, were all liberally washed with Orange Ink. I applied lines in some areas to give the appearance of rusty run-off stains.

The rusty hatch. 

Rusty doors, controls and panels.
Finally I applied White as the final high highlight on the Patina colored areas of the building.

Rusty areas on top.


Patina and copper touch-ups on the doors.

After a few touch ups on the front door, it was now done as well. I love all the details the sculptors put into this model. The control panels were a lot of fun to paint, as were all the Saint statues. I couldn't help but wonder if there are design notes in the studio somewhere that might reveal the names of these forgotten holy characters...

Saint Bannon vs. The Led Zeppelin Hermit.

The project was a quick and fun one to do. I wouldn't mind doing another one, but I will have to see what the shop has laying around.


Wednesday, January 17, 2018

The Snowy Ruins (Part 2)

It warmed up enough outside for me to get this thing primed. After that, I base-coated the ground with Folk Art Patina. At this stage it kind of gives the model a weird look as it was based with aquarium rocks or something...

Patina base coat. 
Here is another pic, a bit closer with the lighting dimmed so you can get a better sense of the Patina's intensity.

Intensity.
I then began the application of Apple Barrel Cloudless (I love the implied positivity of that name). It's a lighter blue but is still intense enough to not dull the Patina too harshly.

Cloudless on the corner.

Cloudless all around.
With that done I started on the White. The camera has a way of white-washing the color out. To better demonstate the contrast this next pic shows a section half painted with a White top coat.

Right side has the White coat.
And the base is now done. Next I started on the ruin proper by painting the doors and other ornamental fixtures with Copper. And with that I called it a night.

Base done and copper bitz painted.

In between my starting this post and finishing it, I managed to get the whole project done. (A rare feat for me.) I will reveal the final piece in the next part, but for now here is a preview:

Saints fighting over a sword. 


Sunday, January 14, 2018

The Snowy Ruins.(Part 1)

Terrain projects have always been an aspect of this hobby that has thrilled me. But in my current living situation I can not really work on them nor do I have the space to store them. Let alone do I have a game table set up at home. Luckily my local game store, Hobbytown USA of Johnson City, has many gaming tables with some great terrain. You can see these tables in most of my Battle Reports. One of my favorite tables is the Snow Table upon which my Chaos forces recently battled the Lions of Harlech.

Ruined building painted by Patrick.

The table, like most of HT tables, was built, painted and modeled by HT's Patrick. He has done brilliant work on these tables and they are a joy to play on. The Snow Table is lacking in terrain however. I have always felt a tad guilty about not having contributed to these tables like others have, which is why I painted the street lights for one of the other tables recently.

Close up details.
But I felt like I could do more.

At the end of the last game session I had there, I took home one of the uncompleted pieces that had been donnated by one of the players. I intend to paint it for the snow table but I need to match it as close as I can to Patrick's models. I asked him what paints he used but his answer ("a lot of different blues!") wasn't particularly helpful, so these pics I took will hopefully guide me.


I took pics of the table itself as well as some of the other features, so that I could try to match the ruin's base as close as possible.


Here the model I brought home. It clearly could use some attention, yes?

The humble dusty model.

The first thing I wanted to do was apply grit to the base. In the end, most of it will be painted to appear like snow.

The grittier the better.
There were a few parts I added to it. Obviously that unpainted part on the very top, and a small buttress on the side.

The backside.
I wanted to spray primer on the base but it not only is far too cold outside to do it, but it is also snowy out there. Fun coincidence, huh?

And it's 10°F as well.

Also, at this time I have a line of miniatures waiting to be primed outside: 20 plastic Daemonettes, Concord c3-strike-troopers, and few other odd-ball minis and models. They'll just have to wait for now. 😀