Monday, May 27, 2019

Stormhawk Interceptor (Part 7)

It was time for the detailing. It took me awhile to figure out exactly which icons I wanted to use. I like to use the original Space Wolf badge whenever possible, often mixing it with the newer 'Blackmane' company badge. But recently I was introduced to a technique that influenced my decision.

Now with Iconography!

Once I decided which decals I wanted to use, I was prepared to start applying decals. Decal application can be a harrowing ordeal for me, but I have learned a lot of techniques over the years and I try to share them on this blog whenever I can. But recently I listened to something that blew my mind; even more so when I proved that it works!

On a recent episode of Voxcast , GW's bi-weekly interview podcast, Mark Bedford was the guest. He recounted his history with GW;  what he had done in the past and what he does now. Basically his entire history with this hobby and GW.  But about just past the halfway part of the interview he revealed a number of techniques and tips that he employs to be a better painter and hobbyist. I encourage you to check these out, a lot of it was eye-opening to me!


The tip in particular that I used on this model was to brush on Gloss Varnish to the area you intend to apply a decal prior to application. This eliminates the bubbles that cause the transparent part of the decal to appear as a film around the application. In the past I have painted over this when it occurs, but since I have been using Microset and Microsol, it hasn't occurred as much if at all. So let's see how my first attempt turned out:

Gloss Varnish applied to the panel.
I applied Gloss Varnish to the two large panels on the side of the cockpit (This is the piece with the aquila on it). The first decal was a stylized '1'.
One hope, one vision.
The other was a yellow diamond. And dang, this technique works like a charm!!!

Yellow diamond.

Since the early '90's GW has produced decals that look like that they were designed to overlap, but in all this time I have never seen a tip on how to actually do this, in fact I still haven't! But this tip from Mark Bedford helped me figure out that once the first decal is dried, if I apply Gloss Varnish over this decal I can apply another one over it without the water from the 2nd one reactivating the 1st one.

2nd decal applied over the first.
And by Russ, it works!!! I am totally thrilled by these results!

Next up I hand painted the Grey Hunters Pack marking to the tail. I assume Grey Hunters pilot these aircraft, since they seem to pilot or drive everything else in the Space Wolf chapter. The current codex is unclear on this.  Anyway, I sketched in the pattern with a micron.

Hand drawn pattern.
I then base coated the area with Khorne Red and Abaddon Black.

Pattern basecoated.
Next I painted Mephiston Red over the Khorne Red and applied a highlight layer of the old Blood Red on top of that. I then tightened up the Black until I was happy with it.

Pack marking finished.
Next I added more decals following the same technique from the Bedford interview. And repeating the overlaying step for the 2nd chapter badge on the wing.

More badges for the top.

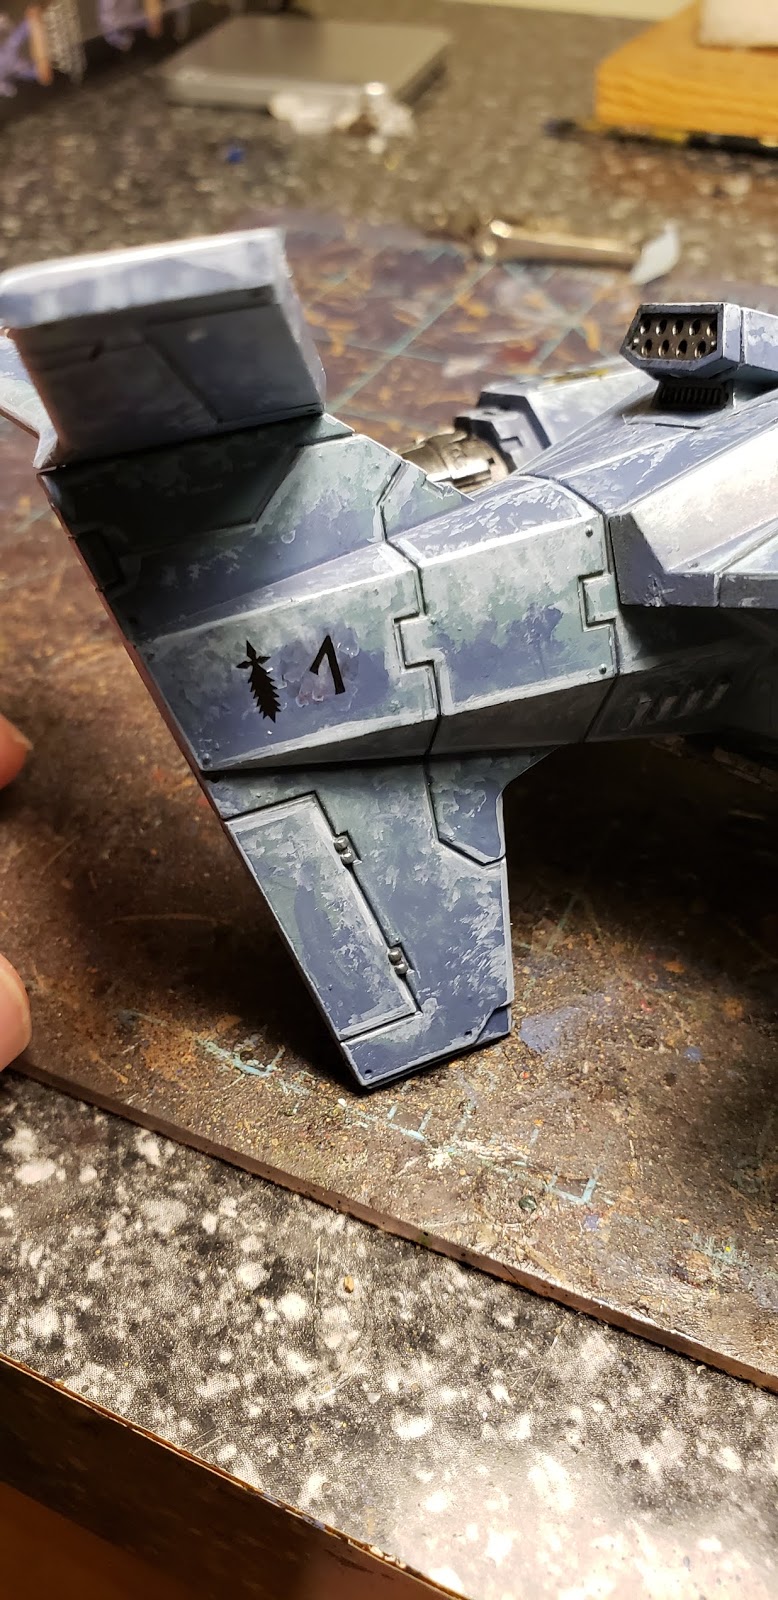
I also added another 1 glyph, some Grey Hunter sword icons to the wing tips and tail and two campaign badges.

Designations added to the tail. 

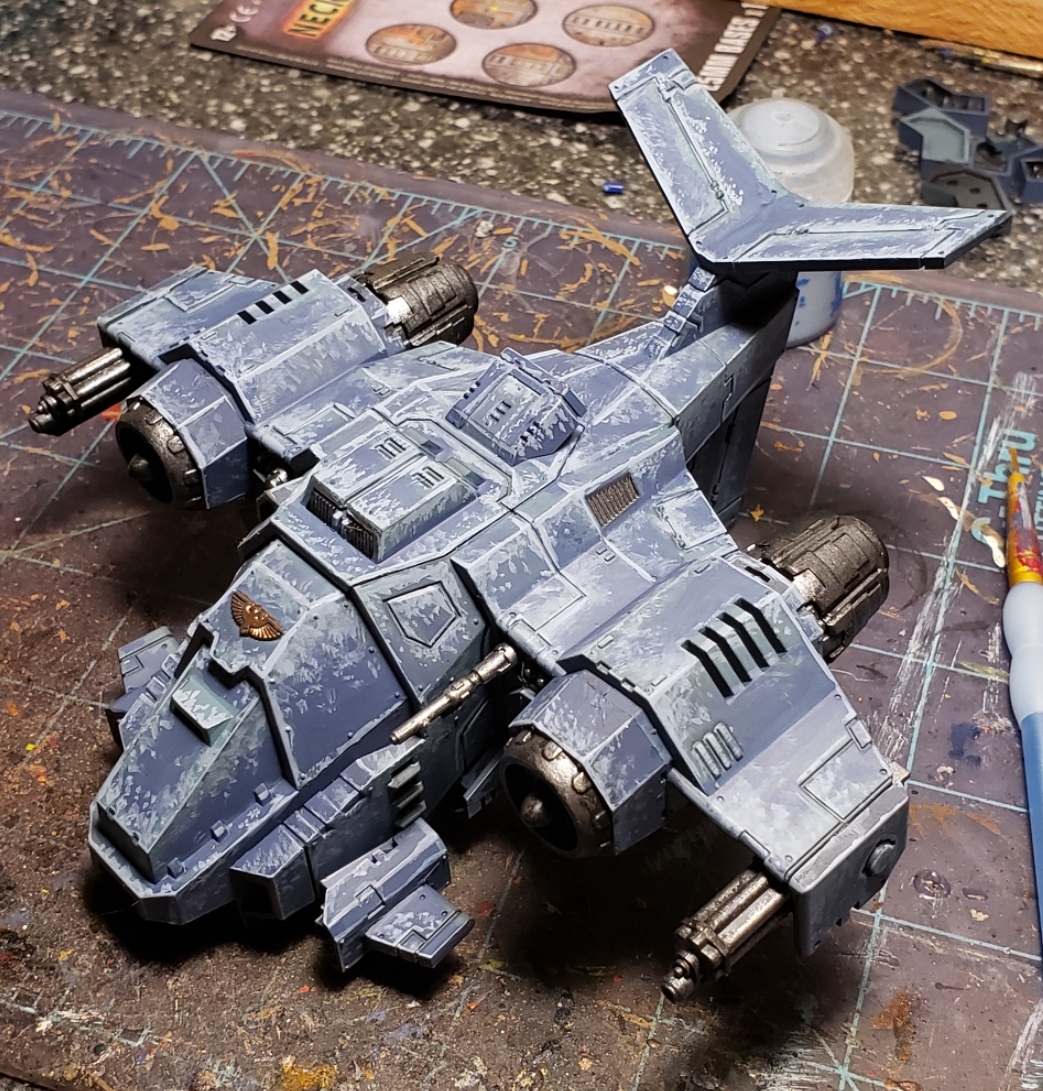
And with that, I declare this thing done!

The finished model. 

The only thing left to do is the base and flight stand but I am waiting for some Bitz that I ordered to arrive before I can proceed with that final stage. Once done I will take some "glamour shots" of this in action. Better yet, I will try to get this thing into some action!


Thursday, May 23, 2019

Black Legion Havocs (Part 1)

Here is a squad I found cheap on ebay. They were clearly kitbashed from leftover parts from a few different sets, but that's cool with me as they have a lot of character as a result. The four guys with meltaguns are particularly interesting as the back half of their torsos are from the Chaos vehicle accessory sprue. They have all this added wiring instead of a traditional backpack. It's a neat look, but I intend to stick backpacks on them regardless.

Rebased on 32mm bases. 

Also, I really like the look of these models without their paldrons. They look a bit tougher to me. Not that I intend to keep them this way however.

After some clean-up I rebased these guys onto 32mm bases and then glued on the grit. After this I primed them with Chaos Black spray paint.

...And they have sat on this state for a long time, although they did get to participate in a game against the Dark Angels during the interim.

After another long time cooling in the paint cue, and excited about the latest Black Legion updates (thanks to the Vigilus campaign books), I felt inspired to work on these again.

Shoulder pads now attached.

I have been jamming away on these guys and it's been going quick, however not quick enough to make my self imposed deadline for this week's blog post, so I'll have to present this in parts.

Just waiting for the final steps...

After I completed the two Grey stages I washed the models in Nuln Oil. The bronze areas were basecoated using Tin Bitz then covered with an old Ral Partha Bronze. These will be highlighted with Shining Gold. After that I will do some touch-ups and slap on some decals and these guys will be essentially done. Look out for Part 2 fairly soon where I will discuss not just those final steps but some challenges that the latest rules update presents to this unit.


Thursday, May 16, 2019

Battle Masters Tower (Part 1)

Greetings!

Recently the notorious Bob and I have been chatting about getting together for another WFB game. Last year we played, and although we had a lot of fun, it was obvious that our local game store is a bit lacking in fantasy themed scenery. I wanted to get a few things for this next encounter (whenever it may occur) so I scoured Ebay for some cheap (-ish) options. As luck would have it I found a guy selling a bunch of parted out Battle Masters stuff, and with that selection was a small tower fort that looks like a little keep. I have always loved that game and everything that came with it, and decided that this would make a fine addition for our Fantasy gaming.

The Battle Masters Tower.

As you can see, the thing is a simple 5 piece model, and since Battle Masters was designed to be disassembled and put back into the box once the game was finished (a novel concept, huh GW?) the tower is easily snapped and unsnapped together.  And, due to storage space reasons, I think I will keep it this way.

You might also notice from that top pic that there is a sticker for the banner. All the pieces in Battle Masters came with brightly colored banner stickers for identification during the game. In fact, when that came out (1992) GW was starting to get into a banner craze where damn near every other model in both WFB and 40K had to have at least one banner per unit. Whoever was behind that vision must have had their dream come true with this game!

Masking the banner. 

I decided to keep the sticker and attempt to paint he rest of the modelled banner to match it. Removing it would a messy, joyless task, so that also influenced my decision to keep it. To preserve the sticker I had to place artist tape over it to mask it prior to applying the primer.

 Before the prime...

Next I took it outside and sprayed on Chaos Black to prime the model.

 ...Not sure if that was a twin-photo worthy event, but I was so thrilled to have a morning without rain that I did it anyway!

...after the prime.
While that paint is curing I figure I should plot out to you readers what my intention is with this paint scheme. I plan on having it match the scheme I used on Death Castle (yes, I know I need to finish it).  But for a minute there I was tempted to try to go for a lighter limestone or flintstone look, just to be different. But I settled on a cold grey granite look instead, considering how this thing is that color already it may have imprinted on my mind over the past 25+ years that it should be grey. So, grey it shall be!

Hopefully I can get it knocked out before the month is over...


Thursday, May 09, 2019

Stormhawk Interceptor (Part 6)

With the assembly done, all that is left is to focus on the final paint coats.

Assembly complete! 
The next paint stage for the main hull was a careful strategic dabbling of Russ Grey blended toward the edges. The edges had a thick line of Russ Grey applied.

Russ Grey dabbing and edges.

And from the anothe angle.
After that I applied a thin dabbling of Space Wolf Grey which, was added near the edges, blending into the Russ Grey. Again, a solid line of Space Wolf Grey was applied to the edges.

Space Wolf Grey layer.

Next, the final step was a thin application of Skull White was added to the edges, bolts and upper most points as a final highlight for the hull.

The Space Wolf colors are done! 

All I have left to do are the details (guns, a few more sensors, etc) and determine what the iconography I will use will be and where it will go.


Monday, May 06, 2019

Stormhawk Interceptor (Part 5)

Hot on the heels of the progress I was making in Part 4 I have continued to capitalize on what free time I could spare to continue working on this model.

Lower Engine assembly.

As I continue to assemble this model I am covering large areas of it with GW's The Fang paint in order to darken the model more for when I get to the proper painting.

The Fang low-lights are painted on.

At this point I realize that this model is smaller than a Rhino but with a ton of parts. And it's starting to become heavy from the weight of all the bitz and glue. Astoundingly, the kit has an entire Sprue that is untouched (all the options for the Stormtalon Gunship). I consider this to be a waste on GW'S part. I'm sure the excuse to include the extra sprue was to save shelf space or some logic like that. But I guess it does provide the modelers out there an opportunity to make unique versions of these things also,  so maybe that's a win? But you do pay more for this box than you do for just the Stormtalon Gunship kit, so it's a win with a cost if it's a win at all.

Too many parts!!!

This thing is coming together nicely though. I noticed after I glued on the sensors with the little fins that their weight is pulling the front fuselage from the cockpit. I apparently did not feel that I needed glue on this area when I joined those sections together but now I see that I was mistaken.

Front fin sensors now painted.

A careful application of glue, a strategic binding of a rubberband and about two hours of time and those gaps are now gone.

For a tighter bond.

The wing and engines are assembled next.

Wings and main engines.

The underwing weapon pods are assembled and joined to the engines. As a happy bonus I discover that the front plates that distinguish the specific weapon options on the pods can simply pop on and off! No magnets required!

Engine mounted weapon pods.

I continue on from here adding the last few bitz from sections 1h and 1i. Then I circle back and add the tall wings that the instructions wanted us to add way back in section 1a. Having seen how fragile the Ork Fighta Bomba's tall fins are, I decided it was best to save that for last with this kit.

All together now! 

And with that, assembly is now complete!!! Hoorah!
...Now onwards to the painting stage, a lot of which is already done.


Wednesday, May 01, 2019

Space Wolf Primaris Reivers (Part 1)

In a recent game of Kill Team I was schooled in the awesomeness that are the Primaris Reivers (well, in Kill Team anyway). So impressed was I that I bought another three-man set before heading out that day. I wasn't so eager as to buy the full 10 man box that GW sells, or the Space Wolf Kill Team five-man boxed set, but a squad of three would work out just fine for future Kill Team games. That weekend I set about assembling these models. I used a few Space Wolf bits to customize these guys, simple stuff really, nothing too advanced.


You might recall that this isn't the first time that I have painted these models. When they first came out in 2017 I painted a box of these for my Ultramarines. I was impressed with how those turned out and how easy they were to work with overall.

After some set backs, I found a few brief windows in my fleeting time to work on these guys a bit, and I got them mostly basecoated.  Hopefully I can get these models painted soon, along with their Intercessor brothers. At the time of this writing  I have actually progressed a bit beyond the pic below, as I have been dabbling with them as I work on the Stormhawk Interceptor. Hopefully I will have more pics to show you soon...

Basecoated with The Fang.