Sunday, December 31, 2017

2017 in Review

A lot like 2016 was, 2017 was another productive year for miniature painting here at the Hobby Chronicle. Even though job changes kept me from home quite a bit, I managed to find a few times to get some mini painting done. Also I had an unplanned two week vacation towards the end of March that allowed me to get a lot of stuff done. So let's see what I did finish in 2017:

Celestial Lions
A 10-man Kill Team with an extra special weapon trooper as an alternate. It took me a while to get them all done but I was very happy with the results. See Celestial Lions Kill Team Part-10 for the final steps in that project.

The Kill Team assembles.

Celestial Lions (San Vet. Sgt). 
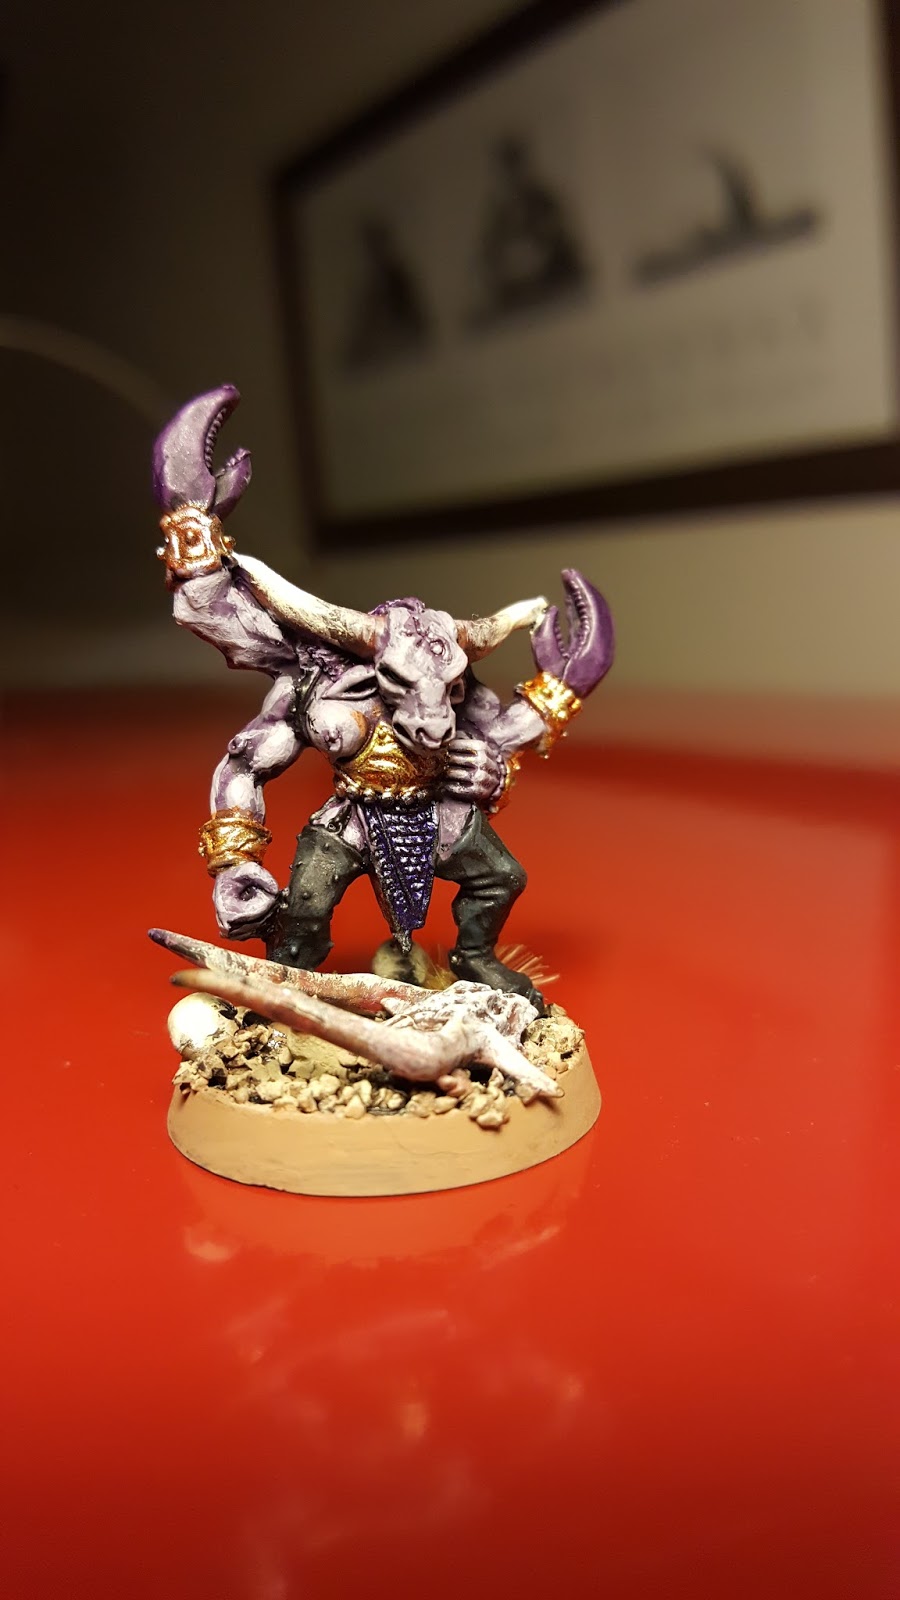

She Who Milks
The nemesis from ancient times and the bane of forest prancers finally got a paint job too. It was inspired by the Hero Base with the tank turret as I was wondering what model to put on it. I quickly realized that it would be a perfect pedestal for She Who Milks. It has resulted in a bit of a Slaanesh Daemon craze for me. You'll see more of what I mean by that in the New Year (I hope).

She Who Milks on the tank that was. 

Fem Fa'Tau
I wanted to do something special and cool for Da Masta Cheef's wife Wolfy and her Fem Fa'Tau force for their anniversary. I found this cool cheese cake model that thought would be fun to paint. And it was. It was my first time ever painting a Tau model or Tau flesh and it enjoyed figuring it all out.
This was done before he decided to revamp their paint scheme...

Too hot for armor.

Anniversary Give-away marine (Iron Warrior)
Speaking of anniversaries, I decided for the first time ever to acknowledge my blog's birthday with a give way. The lucky winner chose Iron Warriors as his paint scheme and a Plasma Gun with a red coil for the finished look It was a lot of and I was happy with the way it turned out. And, from our correspondence, so was the winner!

Iron Warrior on patrol. 

Vindicare Assassin
As part of my Deadly Assassins series, I was able to paint up another Assassin. This time it was a Vindicare Assassin that I managed to complete. At this rate I should get the whole Execution Force done by 2019...
Vindicare Assassin. 

Ultra Marines (Reavers)
I dig the Primaris marines. They are simply cool. So I decided that I just had to paint up a few. I chose to make them go with my Ultramarines force, but it had been so long since I messed with them that I had to reteach myself the steps for painting them. So I painted up a single Ultramarine. Pleased with that I proceeded to finish up this three-man squad. I look forward to doing more with the Primaris marines at some point.

Reavers. 

Ork Dreadnought (Dreadtober)
October was celebrated across the net as Dreadtober and I was compelled to take part in it. So I spent most of the whole month posting about my progress painting an original Ork Dreadnought. It was a lot of fun, and it's got me wanting to pick up another ork project in the New Year.

Ork Dreadnought, piloted by a grot. 

Dark Eldar Beastmaster and Ambull
Wanting to add a bit of flavor to my Dark Eldar Kabalite Warriors Kill Team, I put together a kit-bashed Beastmaster.

Beastmaster.

And her beast, an ancient model from the earliest days of Rogue Trader, The Ambull. Both of these models were finished up fairly quick and I was able to get in a game with them where they were able to cause some mayhem and havoc.
The Ambull. 

Genestealers
This team was the first team I thought about trying out with Kill Team. I had some very old models that I had painted in the early '90s that I wanted to use for my Kill Team but I needed a few more painted models to round out the unit. But more importantly I needed miniatures I could use to differentiate as Specialists during play. That whole project was derailed however due to a missing miniature....

"We need your capris!"

Genestealer Patriarch (Papa Claws)
This model was missing for almost a year but I found him in October, lurking with some Bad Moon Orks. The stage-by-stage of his paint job  was contained in one post as I had so much fun painting him that he was completed fairly quickly.

Who's your papa?


Slaughter Priest
This guy started off as a whimsical and random minor conversion project that I thought I would get done quickly. And the painting did start off kind of quick but other things (mostly Dreadtober) delayed me getting back to him. But I managed to get him finished in this final month of the year.

Preaching to slaughter.

Daemonettes
I painted four of my original Rogue Trader era Daemonettes back when I was working on She Who Milks, as a sort of test of that paint scheme. I decided to add-on to that unit and started painting more of these old Daemonettes in late September but I didn't get a chance to finish until the xmas break.


There were a few other units or models that I worked on throughout the year that I just didn't get finished. Here are a few that come to mind:

 Harlequins were what I started the year with but I never was able to finish anything else for their army.

I assembled a Kill Team of  Space Wolf-Scouts to play with Shadow War: Armageddon (that came and went, huh?) but I am torn on how I should paint them.

My World Eaters are mostly done, but what I need to do for them (decals) just requires a lot more focus and attention than I have been able to find time to give to them.

Coming next year:

Lots of Daemons and some Space Wolves. And hey, if rumors are true they might even become the same army! 😁

Coming soon. Maybe. 

Thursday, December 28, 2017

Daemonettes (Part 2)

Hold on, this is gonna be a big 'un:

Epic even.

I enjoyed the heck out of painting a few Slaanesh Daemons back in the Spring and I've been eager to do so again. In particular I am referring to Daemonettes Part 1 and She Who Milks. Both painting projects went surprisingly fast and I had hoped that I could pull that off again. This project will complete this unit of ten models. Since I have already gone into detail in Part 1 and on the She-Who-Milks thread, I shall not repeat myself here, however what follows is what I can best describe as a slideshow of those steps.

Primed.

Warpfiend Basecoat.

Druchii Violet wash.

Daemonette Flesh.
This next pic was a stage comparison showing where these models were currently at vs. How they would appear when done.

Stage comparison.(the flanking models are done.)

Warpfiend Flesh.

Slaanesh Gray and Slaanesh Grey/White Scar highlight.

Bone color on the skulls.

Next, the golden armor and trinkets where painted in Brazen Gold, then inked with Chestnut Wash before being layered again in Shinning Gold.

Gold areas after the Chestnut Ink wash. 
Lots of details added.
"I shall call you Mini-Moo."
 The leader of this daemonic pack is the old epic Keeper of Secrets. Conveniently sized to also go alongside the old Daemonettes. I originally thought I could use her as a Herald, but another model has been selected for that honor (oooh, foreshadowing!).

Grabbing air.

I have nick-named this one 'Henti Fist', for reasons that ought to be apparent...

Tentacle arm.

These two are the same mini, just different colored armor. They have Fiends of Slaanesh heads and swords. Which had given me some neat color scheme ideas regarding my Fiends unit.

Fiend heads.
 And here they all are, finished and flocked and gathered in their daemonic brilliance.
All together.

And with that, all of my old Rogue Trader era Daemonettes are now painted. But my flirtation with Slaanesh is far from over. Oh no, this going to blossom into a full-on affair in the New Year.


Wednesday, December 20, 2017

Slaughterpriest (Part 3)

Ready to preach slaughter.

The Slaughterpriest is finished.

Here are the final steps that got him here, continuing onwards from Slaughterpriest Part 2, it was time to add the Blood Red to the armored areas.

Blood Red for the armor. 
I then put some focus on the other areas, such as the leather straps and flaps and bronze bitz. 


Something was bothering me though. This model is weird in a subtle way and I kept looking at White Dwarf , Warhammer Visions and other places for color reference on this miniature. Then it struck me; I have made a hilarious mistake! His whole leg is supposed to be armored and somehow I was painting it in a what almost looked like he was wearing armored garters and thigh-highs. I corrected the error right away. Mrs. Neverness thought it was too funny and that I should've left it. In hindsight, I did think the models looks a bit more interesting somehow, but fixing it back would be too much work.

Now with full leg protection. 
Moving on, I added some bronze to the other metal bitz. He is starting to look more uniform now to his World Eater cousins.

Magenta Ink on his mutating arm.
I started at the hand and thinned it down toward the elbow to create a fading effect. I then washed it with Druchii Violet before highlighting the arm with Bugman's Glow. This technique was taken from White Dwarf (the issue this miniature came free with) and although I was reluctant to try it at first I am pleased with the final results. I had to substitute Magenta Ink for Carroburg Crimson simply because I don't own it. The Magenta Ink seems to be a close substitute. Another added bonus was that I discovered that when thinned down with water, Magenta Ink makes a fine 'blush' tone, great for creating sore and other indications of irritated skin. I applied this in a few stratefic parts of his body and in his open scars.

Mutation arm and Other details finished.
Add with completion of a few minor details the model was essentially done.

Finished - front view

Finished- side view

Finished- rear view.
Now at some point in the New Year I'll be looking to add a full unit of Chaos cultists to my assortment of Chaos goons. After all this guy needs somebody to boss around, right?

"Tell me child, have you bled for Khorne today?"


Sunday, December 17, 2017

Death Castle (Part 11.5)


This post concludes the re-presentation of the Death Castle thread I originally posted on http://warhammer-empire.com way back in 2008. See Part 1 for why I am posting it here.

++++++++++++++++++++++++++++++++++++++++++++++++++++++++++++++++++++++++++++++++

11.5
Originally posted on Warhammer-Empire March 20th 2009
Did some more work on the castle today.

Bird's eye view of the top. 

Here is a birds eye view of the top of the tower with the roof stones complete. After some experimenting I opted not to put a handle or hinges on any kind on the roof hatch so as not unbalance any models that may be positioned on the roof. So this is essentially done.

 Though it may be hard to see in some of these pics, I did randomly highlight a few stone by giving them a mix of a watered down brown / flesh ink wash.


After finishing that, I put the handles on the doors! They came out OK I think. I painted these metal, and they stand out good I think.


I painted the housing for the banner pole a rusty metal color to convey a bit of age to the tower (as if it didn’t look war-torn and ravaged already!). I also added some rust color to the stone beneath to show the rocks being stained by the slow decay of the banner holder.


And finally here is a profile shot taken outside in natural lighting.


The next step is the balcony. It may be awhile until the next post as not only will that part of the project be time consuming, but work is about to get a bit taxing.  

Wednesday, December 13, 2017

C3 Strike Troopers -BtGoA (Part 1)

After sitting on this set for a year and a half, it was time to get started on assembling these models. The inspiration (i.e. kick-in-the-rear) came from the Bob who got a set of his own and wasted no time putting it altogether and asked me if we could play through some of the starter scenarios. We haven't gotten to that point yet, so I thought it might be nice to double up everything when we do. So I have begun assembling my The Xilos Horizon minis, starting with the Concord guys.

The 1st three models.

More guys and some drones.

Unfortunately I found assembling these guys to be more of a chore than fun, so now it's been about 5 months since I wrote that top paragragh, and we are now approaching the 2 year mark since I bought the Xilos Horizon set. But I have pushed on and have assembled a lot more of these guys. Now, it should be obvious from the nature of this blog, that I like building models and assembling miniatures. But after putting together the first five or so guys, I found that these Concord models are bit boring to assemble. There are a lot of parts for guys with fairly limited poses.

A 5 man squad still on sprue.
These parts in the next pic are what is needed to assemble just one guy. This guy in particular is a squad leader.


To a degree, I can understand the basic troops having just one set of arm options. After all, they have a standard weapon (and function) but the squad leader should have more than one option! His arm options are a slack right arm and stiff left one. The slack arm is very well sculpted to give the appearance of a heavy gun, but that also limits how you can model it. In the next pic you can see that in an effort to break up the monotony I had this arm appear to be swaying either forward or back a bit depending on the over all stance of the figure. The left arm juts straight out and, depending on how you position it, the gesture can be interpretted as giving a direction or as if he is flailing.

Concord dance try-outs.
Much to my own, admittingly twisted, sense of humor, I could not help but imagine those squad leaders all saying different things. So, from left to right:
"I don't even know these assholes!"
"Hold that elevator!!!"
"Woe, hold on here guys..."
"SUPER-RUN-AWAY!!!"

Haha, anyway, persistence paid off and I got all the Concord plastics built. I like them, but damn were they a lot of work to assemble. My favorite models are the gun drones. I am considering magnetizing their weapon options but we'll see.

All put together. Mostly. 

After nearly two years I am still struggling to decide on a color scheme. They remind me of the Spartans from Halo so I am toying with painting them sort of like that. We'll see...