Showing posts with label model rubble. Show all posts

Saturday, August 01, 2015

Making the Mean Streets part 2 (TSG Post)

Continuing on from part-1, here is some more work that the good Doctor has performed on his terrain. Hopefully by the time I venture up to his part of the world again we will have a glorious battle report full of some wicked pics to color it with! But that's a ways down the road still, and as you can see, the Doc has quite a bit more work to do.


Here are a few different views of the what will become a pedestal for his Space Marine monument.


And here is the same birdseye view as above, but now with a Space Marine on top of it.


These next two photos should give you a good sense of how big and epic this monument is going to be. 


This next series of photos shows the walls being added to the middle level.


I look forwarded to seeing the next stages of this piece and seeing how he will paint it.

(Hint: don't forget the pigeon poop!).


Friday, June 05, 2015

Making the Mean Streets part 1 (TSG post)

Dr TSG has been a busy fella. Over the course of many weeks he has been working diligently on his city terrain.

It started back in February of this year when I got a text message with a few photos that stated: "Got in 2 hours of airbrushing this weekend!"

The Doc has built an airbrush venting station for his his airbrush, and after many years of dreaming about it, he finally got a functioning airbrush studio-spot up and running. Of course, one must start off big with airbrushing right, and what better choice than to go with the some terrain!


 The next pic shows the results of those first 2 hours on this project.


 About a week later he sent me another message:
"Check out the further progress on the board tiles! I tried using an oil wash for the first time- it did a really great job of blending!"

The next few pics shows those results. I am unfamiliar with the oil wash of which he speaks and will try to get more info for you interested readers soon.


About a month later he sends me this pic. I have NO idea WTF if could be, as he does a lot of science stuff and carpentry and other things of which I lack any vocation in, so I had to ask what this was about:

"Working out spacing for my crosswalk template for urban streets. Will build on computer, then print out and cut cardstock master, then cut friskette from that to airbrush the crosswalks on."
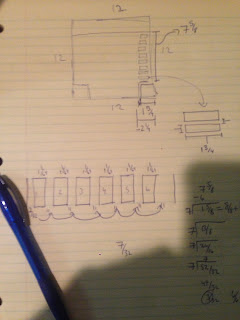
Calculations.
 "This (referring to the pic below) is what I came up with from that: The Cut-Out Template for my friskette so I can paint crosswalks on my urban road tiles."

Template. 
He texted back and forth briefly regarding ideas for Imperial specific icons for roads and sidewalks, and aside from what little can be gleamed from the Necromunda games, there isn't much! He sent me a really cool link I would like to share with you: icons from Alien. Which in turn led to me telling him about the cool scenery Warlord Games sells for Judge Dredd. However, both Alien and Dredd would fit better in the early, pre-gothic, period of Warhammer, like the first few months of it's existence in the earliest days of Rogue Trader. However I can see these things working fine for Necromunda.

The next day he sent me the following pic with this message"

"So this is the final crosswalk template to cut friskette with. At most I will need 4 friskettes at a time."


 Another week passes...
"Crosswalks before washes to tone down and blend."
Followed up a week later with: "Finally got some divider lines on my roads." along with these 4 images:


Masking in progress.
I really like the weathered look to the road paint, as that's pretty much what what all the roads look like in the part of the world that I live in!

He has sent me some more pics showing some of the terrain pieces, which I will save for a future post.


Monday, February 10, 2014

Feeling Khorney part 2

As promised last time in part one, I have started working on an Aspiring Champion and a Banner for my unit of Khorne Berserker World Eater marines. The Aspiring Champion is a metal mini straight from the pack with little modification with exception that he has a plasma pistol from the 2nd edition Space Marine weapons sprue that I have fit to a plastic arm which will have to be pinned for a more secure bound to the metal model.

There are probably a gazillion online tutorials on how to pin a model like this, but in these waning days of GW metal models (and I should also, joyfully declare, Finecast) I don't know how many of these kind of tips are out there anymore, and since I don't think I've ever truly done one, I figured I would make this post about getting a metal/plastic hybrid miniature up to at least base-coated standard (my way). 

The first thing I do when I get a model like this it to seek out the obvious flash, remove it and file it back. This is my least favorite part of the entire hobby to be honest with you, especially as I seem to pour a lot of time and effort into it only to take a pic of the model when it's finished to see a mold-line running across a surface that I somehow missed. It's frustrating but it is a necessary evil. 

When it comes to assembly I quickly recognize which areas will require pinning. Normally in the case of an arm like this, it's two flat surfaces that will be bound together, which is great because superglue loves flat surfaces! Next, pick out the spot you want to put the hole, grab your pin-vice and start screwing away! (No giggles from the peanut gallery please, this next bit is serious...) When working with some metal models I would caution you to be mindful of the shavings as they could be, or contain, lead! Next, add a dot of superglue to the hole once you're satisfied with the depth, and insert whatever you're using as a wire or rod, and clip it down to size ...but not too short. 

Rod has been trimmed!
On the next piece drill a corresponding hole. I will test the depth periodically as I go. 

Both pieces are ready.
 Now that I have it so that both pieces will touch each other and with a rod between them, we're ready for the superglue.
Armed and dangerous! 
 Now, I probably covered this before on this blog to some extent, especially on my terminator-basing-part 1 article, but again, I like to work on the base at this stage to avoid getting brown or whatever color paint on the finished model. Typically with GW models, the slot on the slotta base, which is a uniform size, is usually bigger than the slot/tab on the model. This can leave some seriously annoying holes on either side of the feet that will need to be somehow filled or covered. My solution is fairly straightforward: after I superglue the model to the base I simply place clear tape on the bottom of it, so that the holes now become reservoirs for the PVA glue (I use Elmers, my favorite flavor since Kindergarten!). I fill these holes with as much of the white goop as possible, you can never have too much! (...stop giggling! Jeez...)

Taped and full of glue!
The glue will shrink when dried, and sometimes you might want to add more glue on top of what you've already put in to avoid 'dips' in the final product. It is quite alright to get extra glue on top of the base, as you'll find that this will help disguise the slot of the slottabase even more so.


Also a cheep way to make ice I guess...
I then use the techniques that I discussed in the Terminating Basing posts (Part 2 featuring Sven Axegrinder), which to sum up is to coat the whole surface of the base with slightly watered-down PVA glue, dip in sand or grit, let it try then prime the model. This way I am painting the entire model as I proceed, as opposed to doing the base after the fact.

Based coated and ready for more!
I hope you enjoyed that, it felt like one of those old Blue Peter segments where someone who never cooks is showing you how to make a cake, but has a mixed-up mess he tosses into an oven only to reveal an immaculate "one we did earlier" example of the finished product (here's an example I recall from my youth)...only that I don't have one that I did earlier, except that one guy I showed in the last post! LOL

Now, hopefully by the next post I will get a bit more painting done, but my other, income-related, pursuits have been sucking up my hobby time.

Saturday, August 17, 2013

Rubble! Rubble!

Here's a quick one for you.


While recognizing the urgent need for more scenery pieces for my game table, and being on a tight budget, I came up with the idea making big rubble piles. Particularly big rubble piles out of the discarded frames from Citadel plastic miniatures. So, I aggressively set about randomly cutting up and gluing together a few frames, and this is what you see here!


I then added a few random bits just to break up and pattern one could see as well as give them a sense of scale, otherwise they'll just look like a pile of chopped up sprue. I happened to have some extra tires which, let's face it, nothing says "urban decay" more than random tires! ...Ok, burning barrels maybe, but I don't have many of those. I painted these using black spray paint, 3 shades of grey, 3 shades of brown, and some brown and orange ink for the rusty bits.


To make these thing useable I had to make them high enough to actually obscure a model so as to provide real LOS blocking cover. There is an Emperor's Children marine behind this pile (He has mastered the art of remaining hidden!).


 Elevating the camera higher, the Chaos Space Marine is revealed!

Now, the economic implications of this project needs to addressed. With the increased costs of buying plastic miniatures one must consider the money wasted when empty frames are discarded. Seriously, considering how much money you could be tossing away each time you chuck out one of these things once the bits have been removed! If you considered the weight of the frame vs. the cost, it's enough to drive a miser into massacre mode! So, even if you have no other bits, maximize your plastic box set purchase: every squad comes with a rubble pile!

What you need:

  • Empty model frames (sprues)
  • Clippers or an xacto blade
  • Model glue
  • a base (optional, but trust me, it helps)
  • random bits (tires, barrels, armor plates, doors, hatches, etc.-all of which are optional).

Now, have at it,