Showing posts with label Nurglings. Show all posts

Wednesday, May 03, 2023

Nurgling Ripper Rider (Objective Marker)


Giddy up!

Just like the title says, it's a nurgling riding a tyranid ripper. One of the more amusing things to come from the wilderness of 3D printing. Luckily the ever resourceful Warfrog got one of these for me. And after the initial laughter subsided it occurred to me that it would make for a rather unique objective marker. So I attached it a 40mm base, applied the grit, and took it out for a priming of Corax White. 


The ghost of mischief past.

And here comes the fun! 

Now in glorious technicolor. 

Most of the basecoats were done using Contrast Paints. They were worked very well on this figure bringing out much of the details. Plaguebearer Flesh was used on that cheeky nurgling. Blood Angels Red was used onbthe mushroom caps. Skeleton Horde was used on boney areas and teeth. Both have a their tongues poking out of their mouth and for that I used Volupus Pink.  For non-contrast paints I used Citadel Colour Macrage Blue and Xereus Purple for the Ripper's body. 

Mostly done.

I used Russ Grey and Coat D'arms Lupus Grey for the blue areas of the Ripper. I think this turned out OK for the most part. I'm more satisfied with the purple areas. That was done by applying a layer of Slaanesh Grey then a Druchii Violet wash.  Then another conservative application of Slaanesh Grey but just on it's little pseudo-pod legs. 

View from behind.

I decided to just leave the nurgling alone. The Plaguebearer Contrast paint worked brilliantly. I did put a little thinned Agrax Earthshade in some if the recesses around his most prominent folds and the line of his back,  but that was it.

Grasd tufts added.

Once the tufts were added I called him done. For those keeping count, this is the second Objective Marker that I have completed.  I just need to crank out at least four more for a set of six. But I have ideas, and I have gathered models, to go far beyond that; it's just a matter of time right?

Have you ever needed to secure an objective so bad?


Tuesday, August 31, 2021

Chaos Bikers (Part 9)


Taking a break from painting my Deathwatch army, I decided to be a bit chaotic for a bit and finish off this guy who has been mocking me every day that I walked past the painting table. I had about 20 minutes to kill this morning and that was enough time to tinker on something light. I picked up this model and realized that there was very little left to do on it, so I knocked it out.  

Here's a work in progress shot of the console area. Tesseract Glow being my savior on getting the main screen the way I wanted it took. 

Main consol.

I finished the metallic filigree by washing it with red ink (that's the original '80's-'90's stuff for clarification), then lightly highlighting it with a modern color called Sycorax Bronze which I think turned out very well. 
 
Front faring details.

Then I added Mithereal Silver to high light the areas I thought would get chipped most often. Like the foot rests, handle grips, spikes and blades. Afterwards I mounted it to it's base.


I am sticking with the old skinny bases for my Chaos Bikers, mainly because having already down work on a number of them already I am not too keen on tearing them off their bases. Some of my other armies that utilize bikers, orks for example, I may move to the newer oval bases.


At this time I have decided to leave the rider unattached to bike as he fits so well and I like the option to be able to remove him.


Unlike the other optional champions I have made for  this unit, I have not been able to take him out yet for a glamor shot, but I intend to do so soon. 


Monday, July 05, 2021

Nurgle Champion Bust (Art Monday)

 Here's one I forgot about. This is a Champion of Nurgle, complete with some adorable nurglings to accompany him. If I remember this one took a lot of time to do. I regret that I didn't include his backpack, but whatever...


This was done as a submission piece to Inquisitor Magazine, which was fanzine that supported Warhammer 40,000 and showcased the kits that Armorcast made to support it. Back in the '90s Armorcast was an amazing support line and it's successful showed GW that there was a future in resign support products. Unfortunately, Armorcast's was also they're undoing as GW ended their agreement a created Forgeworld. But, that's another story really, it's Inquisitor Magazine that I wanted to get art into, so I contacted Tim and he liked my stuff enough to put it into two issues (#14 and #15). This piece however is one of the ones that didn't make the cut (it was a bit too gross for that publication). In hindsight, I should have drawn more vehicles, since thats what Armorcast was mainly producing, but I was more interested at the time in exploring a bit more of the human, or personal side of the Warhammer 40,000 universe.  

Friday, April 16, 2021

Chaos Bikers (Part 8)


The current level of progress.

Progress has continued since the last time I worked on this guy. What follows is how I got this guy up to this point. 

 The metallic trim and filigree is the most obvious addition. This was done using Balthazar Gold as the base with Auric Armor Gold drybrushed over it. 

Basecoats on the trim.

To finish off the trim I went over all over it with Red ink glaze 

The finished trim. 

I went over the mechanical areas of the bike using Black Contrast Paint. This deepened things up nicely and really adds a dirty and oily aspect to this thing. Next I turned my attention to the two nurglings, following the process outline in Eeew, Grotti Part-2. 

Nurglings, half-way thru the paint stages.

After finishing the nurglings, I thought the final Pallid Flesh look didn't stand out against the aged pre-heresy Death Guard color of the bike. So I added an additional wash of the Contrast Medium and the Volupus Pink Contrast Paint mix to pinken these little buggers up a bit.  I like how they have turned out. 

Pinkies!

I used Tesseract Glow Technical Paint on the console screen. I like how it came out. It's a bit abstract but I think it's function comes acrossed in the complete result. This technical paint has turned out to be quite a useful tool for me, and I don't have any Necrons!
 
The display screen.

Over all this thing is starting to come together. Yeah, it looks a little sloppy but it will tighten up in the highlight stage (hopefully). 


Monday, April 05, 2021

Chaos Bikers (Part 7)


Something revolting in development.

When I set out to build and paint this unit the original concept was to have all of the standard bikes be Black Legion colored with the Champion singled out as representing whatever Mark Of Chaos I was bestowing upon the unit. With the changes of game editions since I last worked on these guys (or played them) the need to show the chaos marks in this manner has become somewhat redundant. Hell, Death Guard don't even have Chaos Bikers as an option any longer! But, that hasn't stopped me from realizing my vision. While going through my paint queue this guy leapt out at me. With my recent Death Guard Experiments I knew I just had to finish this guy. 

Drilling and pinning. Some hobby skills never die...

You might have noticed his crazy Plaguebearer head. I found it in a bitz box while looking for other bits to stick on this guy and I was immediately inspired to make this mutation become a thing. I had to create the ball joint for the neck out of greenstuff in order to get this head to look right. 

So much for following helmet laws...

I stuck a nurgling rider on the back of the bike which I think came out very characterful. I really like how his foot is propped up perfectly on the backrest of the rider's seat. 

A rotten rider.

Next I added another nurgling at his side. This little chum (hehe, "chum"!) is joyfully pulling out the rider's guts in typical backseat driver fashion. 

"Hang on to my guts little dude!"


As you might guess, this was a fun thing to model up. As you can see the nurgling is totally attached to the driver, happily holding on by the guy's guts. 

Hanging on tightly! 

After priming it, it was time to figure out how to paint this thing. Last time I showed you Grotti and the way I colored him which was totally done with this model in mind. 

Basecoats mostly done.

The basecoats you see here are as follows.:

The fleshy seat and face stretched over his right shoulder pad were coated using Gulliman Flesh Contrast Paint. I like how the seat came out so much that I am likely to just leave it as is. 

The rider's head was done using Plaguebearer Flesh Contrast Paint. 

All the brown metal areas were basecoated using Rhinox Hide. 

The rider and bike's armor was based using Rakarth Flesh. The rider and bike are going to look a lot like The fourth Death Guard Experiment, hopefully. 

I got to be fast and sloppy at this stage, but going forward I will need to slow down a bit and focus on the details.

Sunday, March 28, 2021

Eeew, Grotti (Part 2)


Grotti.

It's close to 5 years now since I last put any consideration towards this miniature. While reviewing my painting queue backlog at the New Year I found him lurking under some backpack sprues for my Deathwatch Marines. I have more nurglings that I want to paint in the near future and I wanted to play around with some different color schemes, so finding him was a nice surprise. 


In the first post on this little fellow (Eeew, Grotti) I wrote about how I was indecisive regarding how I wanted to color him. Sadly the rules for this fellow were quickly left behind with the change from 7th Edition Warhammer 40,000 to the 8tb, and I doubt he'll be back in 9th. His disappearance from the rules meant the necessity for completion was all but eliminated. But now he has a use as a test-bed for some color experiments. 

And the color experiment that I have in mind is based on the tutorial (How To Paint Death Guard: Nurlgings) that Warhammer TV posted using Contrast Paints. It seemed simple enough, and I have been curious to see what I could pull off using Contrast Medium and this is the perfect excuse to try it out. 


Pallid Flesh undercoat.

The first step is to paint Pallid Flesh over the entire model. Which is a weird way to start out but watch where this goes from here...

Next I followed the instructions from that video bu adding some Volupuis Pink Contrast paint to some Contrast Medium. Once that dried I added some more Volupuis Pink with a bit less Contrast Medium to the recesses. I was quite pleased with the results thus far! 

Contrast Medium/Volupuis Pink layer.

Continuing on with steps layer out in the video, I next applied some "very cheeky highlights" to the raised areas of the fleshy bits. This was done using Pallid Wyche Flesh. Again, I am loving how this is turning out, and even more so considering the speed in which it was accomplished in. 

Pallid Wyche Flesh highlight.

It was time for the final touches. The tongue was painted using the same technique I used for the guts on the recent Death Guard Experiments (Screamer Pink, Druchii Violet and Pink Horror). The horns I decided to keep simple and low-key. I did this by mixing 75% Drakenhof Nightshade and 25% Coelia Greenshade. Finally I dotted the eyes with Folkart Lemmonade.

Final touches.


Finally I finished off the base's rim and added a  grass tuft or two...and presto, done! Although I am considering adding some gloss varnish to the grossier bits...

The scenic Grotti.

Despite the perception one may get from the staging pics, it really went pretty quick. Which makes me considerably happy when I realize just how may nurglings I will be painting in the future (hint: it'll be a lot).

Wednesday, June 29, 2016

Eeew, Grotti

While reading through the delicious additions to the Chaos Daemon lists in the Curse of the Wulfen rules book, I came across the rather potent wargear item called Grotti. He is the foulest nurgling ever, so foul that fielding him reduces the Toughness of all non-daemons of Nurgle on the board by -1. That's one hell of an awesome item! I quickly thought that, like an ammo grot, or a spell familiar this needs to be represented by a model to place along side whichever model that has Grotti accompanying him.

Digging through the bitz box I found that I had some loose plastic nurglings. So I picked out a fellow I thought would do a fine job standing on his own as the loathsome Grotti and stuck him on 28mm slotta base.

Grotti on a 28mm slotta base.
Being a slotta base, and a model with no slotta, I would have to fill in the slot. I use this technique a lot, but rarely show it on this blog. Basically I tape the bottom of the slot after the model has been affixed (usually) and pour PVA glue into the top.

Tape secure from beneath. I used 'Artist Tape' for this. 

Filled in the hole with PVA glue and began to add some grit. 
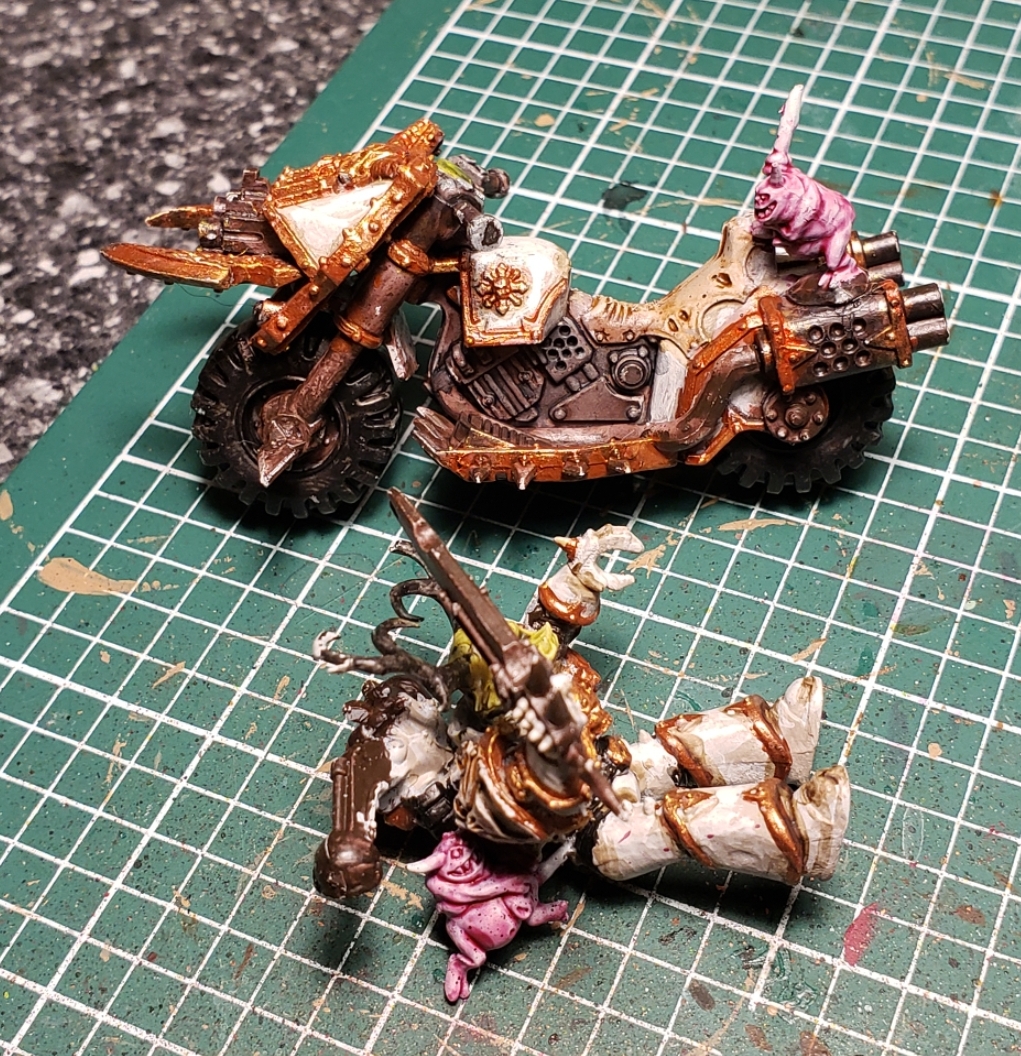
After that was done I used a glue/water mix to spread all over the top of the base. Before it had any chance to dry the whole model was plunged into a bag of course basing material. Afterwards it is taken outside and primed with the appropriate paint. In this situation I decided I wanted his colors to be more intense so I went with a white primer.


Nurglings are usually depicted in a variety of colors and I intend to do likewise with mine. But for Grotti I am indecisive about how exactly I want him to look. Should he appear greenish like a scabby looking pea? Or more of an olive drab? Or a fleshy clammy looking ball of something that escaped Fabious Bile's personal blood dumpster?

Too many decisions really, but it got me thinking about nurgle colors, and how I want my Nurgle Daemons and my Deathguard Chaos Space Marines to look. And it got me self-debating whether or not I wanted to strip the paint off of my early 90s Deathguard or try to integrate new models in with them.

*sigh*
-"Indecision clouds my vision".
 This upcoming nurgle  project may be more challenging to me than I realize... but I'm excited with the possibilities regardless!