Friday, August 26, 2016

Bolt Action: British Infantry Division (Part Five)


A'hoy there! As I declared in the last post, these lads are done! All I had left to do was add some static grass and some grass tufts and that was it.

"Advance!"

"Take this table!!!"

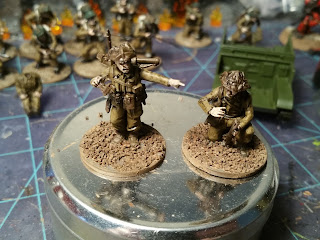
However I decided that these models would be the perfect candidates to try a touch of a bit more realism: leaves. 28mm scaled ones anyway.
Bag O mini leaves.

I first became aware of this nice modeling accessory a few years ago while skimming through the gallery page on Warhammer-Empire's Brush and palette page. Somebody had used these on a city street scene and it made the whole thing look so much more alive. My local gaming store got some of these in stock with their Secret Weapon Masterclass Scenics supplies and I had to buy a pack. I was hoping to add them to my death castle project but since I never got back around to ever finishing that, the pack of leaves remained unopened. Until now that is!
Now with leaves.
I applied them by first adding a dot of PVA glue to the spot on the base that I want the leaf to go and with a pair of tweezers I then pressed the leaf onto the selected area. After letting the glue to dry, they were finally finished. The added flourish of the fallen leaves does add that touch of realism that I hoped to get by their inclusion.

"Crikey, where in hell have we been deployed too?" 

(The dynamic artistic shot)
With that, the first phase of my Bolt Action British Army is complete. I have another 10 Infantry left to complete, some spotters and Command Offiers and that will get me mostly done with phase 2 unless I decide to add something else. Phase 3 is a box of Red Devils and some Wargames Foundry Home Guard on bicycles. I am toying with getting some heavy artillery and maybe another tank, but we'll see. I want to keep this fairly small and not get carried away like I tend to do with 40k.


Monday, August 22, 2016

Bolt Action: Universal Carrier (Part Three)

Continuing right where we left off I continued to apply color to the tracks. I dry brushed on a brighter metal color over the raised surfaces, but liberally so.

Metal drybrushed on tracks
 Next up, I used an old Citadel color called Jungle Green to thinly highlight the edges of the vehicle.

Jungle Green highlight.
 To add a bit more weathering I mixed brown and orange ink together which I used with a dab of water to wash over the all of the track assembly and the under carriage of the Universal Carrier.

Weathering applied
 Also I mixed green and black ink together which I used to darker the joins and grooves on the main hull. I also applied this onto yhe track wheels as these components were often painted to protect from weathering. I imagine these bits would have to be repainted often during maintenance due to the obvious wear and tear these machines would endure.

Next I popped in the part that I assume is this thing's engine. It fit so tightly that I didn't even take it back out to glue it, instead I only glued the piece that goes on top of it which will hold it in place just fine.


I decided that with the variously equipped troops that would be occupying the back of this thing that the paint would be pretty scuffed up. And the floor plate would be dirty as well.

Scuffed and weathered.

After some touch-ups, the crew are now done. The only thing left to do for them is to afix the patch decals to their arms and the decals on the vehicle before adding on the final parts.

Almost there! 
Next, the decals were transferred onto the hull.

Yo Joe!

Gosh, this vehicle looks WAY too clean! I will definitely need to dirty it up a bit before it's done. In it's current state it reminds me of an old '80s era G.I.Joe toy. This is the current state of the thing, next to add the final bitz and dirty it up a little and it's done!


Saturday, August 20, 2016

Bolt Action - British Infantry (part four)

Work continues on this army!

Finished Mortar Team.

 This post will focus on pretty much just these two models that form my Mortar Team and will function as a step-by-step guide for my own reference in the likely event that I set these asside for a year again and struggle to recall how I painted them...

Let's start from the base-coat: After applying a brown base-coat I then painted  the grit on the base.


After that Vallejo Model Color English Uniform was applied. However, looking at the models that I worked on last year, it seems that I used a brown ink wash to give the models more depth. So I repeated that with these guys and here is what they looked like at that stage:

Brown ink wash over most of the model.

Next the Vallejo Model Color English Uniform was added on the clothing, and Citadel Dwarf Flesh was applied to the skin.


A dab of Skull White was mixed into approximately 5 dabs of English Uniform to be used as a highlight color


Next the belts were painted using Applebarrel Linen. The grit on the base was finished off with a layer of Country Tan and highlighted with Sandstone.


After that came the application of Bleached Bone as a highlight to the fleshy areas. The helmets were painted using Apple Barrel Forest Green. The belts and pouches were highlighted with Delta Ceramcoat Raw Linen.

Next the wooden parts of the guns were painted before turning my attention to their helmets.  I highlighted helmets and then painted the leaves an assortment of leafy colors.

At this point these chaps are mostly done. Although some touch-ups scream out to me and I will address them soon enough.


Decals were added to their arms for insignia and rank. My only complaint about Warlord is that neither their BA books nor Painting Guide PDF had any clear info on British Army rank badges or insignia. So I winged it on what I could find online.

After that it was time to flock the bases. I used a combo of static grass and grass tufts to complete this look. And presto: they are done!


Did I mention that I was finishing the Infantry Division at the same time? I haven't flocked their bases yet, so they'll get their own post, but I did finish the PIAT Team. Here they are:


Feels good to get these guys done. The Infantry Division will be following soon.

Sunday, August 14, 2016

Deathwatch: Killteam Neverness

With all these exciting Deathwatch releases that have came out (and as of this writing, still coming out) over the past year, it was finally time to break out my Deathwatch guys. I started this killteam back in 2004, when Warhammer 40,000 saw the release of it's 4th edition. It wasn't long after the core launch that 4th ed's Tyranid Codex was released. To coincide with it White Dwarf, in one of the last Chapter Approved articles, did an article on the Deathwatch and all of their snazy Specialist Ammo. So began my work on these guys, but that work languished due to a lot of factors and ultimately they were packed away for another day.

The Deathwatch Vets. In their disarmed state.


As some long time readers of this blog might know, this wasn't the only time I dabbled with the Deathwatch. Back in 2013 I modeled up my player character for The Doctor's Deathwatch RPG campaign, Erik Axegrinder. I used him in a few 40k games as either a Lone Wolf or a Wolf Guard Pack Leader.

Erik Axegrinder.

Along comes Death Masque, the starter set I just can't resist. A perfect little force for Deathwatch and Harlequins (recall my recent clowning-around, part one and part-2.) both are armies I would like to build up, but as small forces likely to be used primarily as allies.

Over the weekend I bought the new Deathwatch Codex and with that came the flood of ideas that spring forth while reading this new book. Oddly, I am confused by the game designers decision to exclude any special characters  considering the Killteam Casisus models and the new Artemis model. It seems like a new turn fro GW. But reading through the rules, I am quickly moving past that.

Deathwatch Librarian.

The Librarian above was selected to be the leader of my Killteam. And he is sure to have a role in the upcoming allied force that I am constructing. True Grit was still a thing when I started building him, thus the one handed bolter idea. Not that the rule would have applied to him so much as I just thought that it looked cool.

Heavy Bolter marine.

One of the reasons I wanted to make some Deathwatch marines way back then was that it would give me an excuse to paint up some marines from different Chapters, even if all I would be painting is just their respective shoulder pads. A Chapter that I always thought was cool but I knew I would never do a proper army of, is the White Consuls. This guy in particular is the heavy bolter trooper. Oddly, this model came missing his left arm so I constructed one using some bitz.

White Consul badge. 
I hand painted this icon, but it was so long ago that I can't recall if it was difficult or not. Sadly, I may have to repaint it and according to the background in the new codex, animal/beast Chapter icons are stated to be painted facing forward as a show of vigilance and bravery. So that's something to consider...

After Death Masque arrives I will be able to maximize all the extra bitz I will have on the 3 guys that don't have arms yet. I am looking forward to pretty much completing 2 small armies with this one boxed set.


Wednesday, August 10, 2016

Bolt Action: Universal Carrier (Part Two)

While working on my British Infantry it only seemed natural that I would also work on this model as well.

I chose to base coat the crew with a dark brown color while they were still on the sprue. I did this more for the need to keep track of the parts, pieces and bitz than anything. These Warlord kits have a lot of them and I really don't want to lose any of them, especially now that the Spawn of Neverness is crawling all over the house these days.

Brown basecoats applied!
Brown ink wash applied.
I decided to give these chaps a brown ink wash as I thought they would contrast better against the vehicle with the extra depth that the darker shadows would create.

...Looks like a massacre doesn't it?
I then seperated them from the sprues, cleaned off the flash, and gave them another drybrush of Vallejo Model Color English Uniform. An asside: the guy on the left really looks like a wounded guy in that position, I can't help but wonder if there is a bitz market yet for Warlord models? If so, I have some ideas...

Anyway, I then clipped off the bitz I will need to begin the main hull assembly.


I painted the track assembly black, but I did this liberally as I don't mind if a bit a green shows though as I want this thing to look like it's been in the field for awhile.

Now, for the assembly:

Making tracks!
To get more of rugged look I used a slightly watered down dark brown which I liberally applied to area where the tracks will go prior to gluing the track assembly into place. I gave the tracks a wash the same color paint but with more water added to the mix.


Next I put together the main hull. The model itself is really easy to assemble by-the-way.

Test fit. 

While test fitting the model I felt some validation by deciding to paint this as I assemble it. Trying to paint these guys after assembly would have been tough!

Masking tape applied.
It became obvious that I need more of the green base coat painted on. In order to avoid destroying the work I had already done to the tracks I used masking tape (artist tape particularly) over the tracks.

Additional spray added.

The added spray worked out well. After it dried I added the back piece onto the model. And now it is beginning to appear more and more like an actual vehicle.


As you can also see in the above pic, painting on the crew is coming along as well. I will have them fully painted prior to fitting them into the Bren Carrier.

With the appropriate amount of determination, this model will be finished soon!

Sunday, August 07, 2016

Bolt Action - British Infantry (part three)

Work progresses on these guys, as I find myself being pulled into the details that these wonderful models have.


Here you can see where I added a highlight color to the khaki backpack, straps and other khaki items.


I use Folk Art Linen on top of the brown base-coat before highlighting with Delta Ceramcoat Raw Linen. Incidentally these are also the colors I use on my Empire troops for WHFB and other fantasy figures. (To see examples of them scroll down on the other-armies page.)


Next, I highlighted the helmets. I used an old color that came from the Epic Paint-set that GW made in the early '90s, although I don't recall it's name. It had turned into a weird mix of plastic slime and something akin to liquid greenstuff with the separated medium pooled on top of it. I was able to mix it up enough to get a working paint out of it though and it worked as a great highlight color on top of the Forest Green Apple Barrel paint. I suspect I may have to seek out a replacement color for this at some point.

Also I applied a color onto the guns that's even older: the original Bolt Gun Metal from the Space Marine Paint set of '89. This was still the best version of Bolt Gun Metal ever produced as it was darker and had a more 'forged iron' look to it. It looks fantastic dry brushed over FolkArt Metallic Sequin Black. Sadly, my supply of this amazing color is running low and I hope Coat D'arms has it still but with a new name.

++++++

While working on the Infantry Section in the section of this post, I finally decided how I wanted to finish up the remaining plastic models I have left over from the boxed set (unlike GW kits, Warlord kits will allow you to make a lot more units!). Need for more support teams seems obvious and the killing potential of even the 2" mortar seems worthy to try out (particularly in the upcoming new edition which will introduce templates). So here is what I pieced together last night:

Before the helmets. 
If you are a regular GW player/modeler, all I can say is that you've been spoiled. Spoiled by simplicity. This kit is not for the speed modeler, as a lot of the accessories are tiny and require patience and skill with glue application to get them to go where you want them to go. I have a pair of tweezers that I keep on hand in my modeling toolbox and I found them to be very helpful with assembling these models.

With the helmets. 

I have since  added grit to the base and they are ready to prime!

More soon!