Showing posts with label 1st Edition Imperial Guard paint scheme. Show all posts

Friday, May 06, 2022

Wounded Guardsman (Objective Marker)


Wounded Guardsman Objective.

After a few games of Warhammer 40,000 9th edition it has became apparent that I needed to make some proper Objective Markers. There are some that I started many years ago using the 3rd Edition Space Hulk objectives that I just never finished. Digging them out and polishing them off shouldn't be too hard... I just got to remember where they're at... so in the meanwhile I had an idea to use this old Cadian casualty. 

A gathering of bitz.

Simple concept, wounded Guardsman with com kit. He has probably radioed out and is holding tight (and holding back the blood) for help to arrive. Pretty simple piece and tells it's own snippet of a story. 

Making a mound from greenstuff.

After gluing the two bases together I applied some green stuff to smooth out the harsh separation between the two bases. This makes it appear as it this Cadian fellow is on a small incline and is ever so slightly elevated above the battlefield. 
 
Next came the grit then the primer. 

Ah, those long Autumn* shadows.

And then the base coats were applied. I followed the exact steps I used to get my old Cadians 'battle ready' this past summer. And the steps I took on their middle stages. But I was going for a 'parade ready' look so I bit more work was ahead for me.

Basecoats. 

Once I was happy with the final scheme it was time to add a decal to the left shoulder pad. First I painted on the divided circle. I matched this with those Cadians I painted ages ago. Then I applied the classic regimental squad ID decal. I love this so much better than the current decals. 

Under colors for the regimental badge.

I was happy that the decal was on good I sealed the model with flat varnish. It's a metal miniature after all and chips and dings are not welcome.

Finished and sealed.

Grass tufts were added to complete the scene. 

Backside of the model.

I was very tempted, like I had the paint-pot open and ready to dip in a brush, to add some Blood For The Blood God to this chap but I decided at the last second that gore at that level just wasn't necessary for this piece. He's hurt enough I think. 

Finished and ready for evac.

And there we have it, a completed Objective Piece. Now I need to come up with at least 5 more...


*Yeah, I started this in Autumn, dabbled on it in the Winter and finished it in the Spring. Sometimes I just pick and poke at these things. 


Wednesday, November 03, 2021

Cadia Stands! (Part 2)

 Since the last time I posted about these fellows they have seen combat, and have been lurking in the background of every project that I have done since then. Slowly though, they have accumulated a little paint here and there.  In the first post it was all about getting these guys battle-ready. I basecoated the models and tightened them up for presentation in a battle report. From here on out though, we're going to be getting them up to what GW calls "parade-ready".  Well for me my goal is set to get them to look like the test model as shown in the first post. 

Middle layer applied to uniforms.

The color I used on the middle layer for their uniforms is an Apple Barrel color called Country Grey which I found works great for getting that classic Rogue Trader era Imperial Guard look. The other area that I did a mid-coat on was the metallic iconography. I used Folk Art Metallic Antique Copper on these areas.  

The Sarge at mid-coat. 

Next I used Nuln Oil in the recesses to help deepen the shadows. On the test miniature, which was done around the turn of the century, I used a thinned down Black Ink, which basically what Nuln Oil is. I also painted the strap on the front of the helmet and highlighted the black areas.

Nuln Oil in the grooves.

Well, what was supposed to happen with the rest of this post was that I was going to focus on finishing just the Sarge. However I was stunned -stymied- denied! -the opportunity to do this upon discovering that both of my Space Wolves Grey paint pots have dried up. One of those post was from the Space Marines Paintset from '89 and the other onc was from the early '00s. The larger impact upon my hobby is that my Space Wolves army is truly reliant upon this color. The current GW analog, although nice, isn't as bright as the traditional Space Wolves Grey was. Bemoaning this to Da Masta Cheef, he suggested that I finally give Coat D'Arms colors a shot. I followed his advice and those colors are now on the way to me from Canada. With any luck I should be able to get back to this project soon. 


Friday, May 14, 2021

Ratlings Report (Part 1)

 Ratlings!

 My recent challenge to paint 500 pts in Imperial Guard led to my attention falling on these guys. They were the first IG miniatures that I ever owned, but they weren't necessarily purchased for use in the Imperial Army. Way back in in 1994 while in my 2nd year of art school, some of my roommates and I decided run a Chaos campaign as detailed in the back of Realm Of Chaos: The Lost And The Damned. We generated by rolled up and/or selecting our champions and warbands and, well, chaos truly ensued. There were just three of us playing this campaign. Ron chose Slaanesh, Scott chose Khorne and I selected Nurgle.  My champion to lead them was randomly generated and I rolled up a Ratling. 

"What? Me, a chaos champion?!"

We scoured the game and hobby stores in that part of New Jersey until I found a blister of Ratlings. I selected the one that appeared to be in charge and made him my champion. Something about his appearance reminded me of a classmate so I named him Howie N'wtaewn, a chaotic bastardization of my classmate's name. 

Adorable murderer.

In the course of the campaign my Ratlings received some crazy rewards and gifts. At one point the ratling unit were gifted with Grav Gun Techno arms which were better than their actual needle rifles. I recall an instance where they totally wrecked a rival Predator tank by grav attacking it's tracks, flipping it and ultimately exploding it. This was using the 1st Edtion Vehicle Manual, the ruleset with the clear targeting grid. 

Another gift, one that Howie received,  was the Nurgle gift of Immensity. A hilarious conundrum for a ratling. For a long time I pondered on how to convert up this model. In time,  I gave up on the notion, and as the editions rolled away in time, the prospect has felt more and more unnecessary. 

Queuing up.

Back to present, and here they are answering the call to rid the Imperium of foul xenos filth. After reglueing them to their bases it was necessary to fill the gaps in their slotta bases. I do this by first taping over the bottom of the base's slot.

Tape on the base bottom.

And then I will the gap with glue, and I repeat this step over and over until the it dries. If you don't do it enough you may still end up with a dip in flock or whatever basing material you employ. 

Gluing the gaps.

With the basing done, I took them out and primed them. The next morning I painted their skin areas with Gulliman Fleshwash, their guns with and their bases. 

Ready for battle? 

These models aren't even truly basecoated yet but I at least got to the classic three-color-minimun to justify putting them into action. Which later that day I did! And they performed pretty good actually. I look forward to finishing these chaps when I can.

Wednesday, May 05, 2021

Cadia Stands! (Part 1)


Finished and basecoated. 

Recently I tried to arrange a game with Da Masta Cheef which sadly didn't happen. We had set the point limit for just 500pts and with that low a model count I started to look at my armies that I rarely play. I decided to make a list for an army that I have never played (at least not within the decade that this blog has existed): Imperial Guard.  I have two Imperial Guard armies, Valhalla and Cadia, very little which of either are painted.  When it comes to painting them, I have always been intimated by the sheer number of these guys I have for both armies.  And I have been having fun with projects already in the queue so the urgency to get to them has simply never been there. But, 500 pts....hmm. I was able to cobble together a decent list for that with half of the models painted. Since the game was canceled faster than we could plan it, I found myself with the free time to really look at these guys. I love the original metal Cadians. I like the plastic ones just fine too, but the metals had a character and charm the plastics lack. I assembled a squad of totally unpainted minis and decided, "screw it, it's just one squad of infantry, let's do it!"

Cadia stands...in the Neverness paint queue.

The first thing I did was clean up the flash and mold lines. A chore I don't miss when it comes to metals. Then I added grit and skulls to their bases. Then it was prime time. 

Prime time.

I chose a white primer this time. The last time I painted this color scheme on Guardsmen I used a black primer and was a bit unimpressed with the outcome.  They're fine I guess, but compared to the first test model I had done a few years earlier,  I found them lacking. I intend to not let that happen to these guys. 

So I revisted the first test model I did way back around the turn of this century ('99? 2k?). I have shown this model on this blog before but those pics were not the best so here it is again and from more than one angle. 

Original test model

Test model from behind.

I struggle to recall the exact formula I used on this guy originally, but my pallette was very much limited back then compared to what I have now so it shouldn't be too hard to figure out. 

I started by using Gulliman Flesh Contrast Paint on the skin. This is the dream color for anyone who wants to get their Caucasian skinned miniatures battle-ready as soon as possible. Two layers of tha paint and it's passable in my book. Ultimately I will work on it more but for now, it's alright.
Basecoats (front).

The Grey uniform was basecoated using Craftmade Graphite. The black areas were basecoated using Abaddon Black. I used Mournfang Brown on all the brown areas. The pouches and bedroll was painted using Tamiya Color Olive Drab. The aquillas are going to be down in metallic golds. I like how these came out on the test model but that yellow is a pain to paint and they look a bit too...'90s.

Basecoat (rear)

These basecoats came out well, and I think it's good enough to be battle-ready honestly.  I took advange of the moment and repeated this process on the rest of the unit. 

The whole unit. 

I plan to to paint these guys up to the level of the test model. But for now I am happy to have, what I consider to be, a battle-ready unit for when the chance to have that game with Cheef ever arises. Oh, wait, it did happen! Expect a battle report soon! 

Sarge says: "Come back for some xenos slaughter!"


Saturday, April 01, 2017

The Return of She Who Milks (part 4).

Alright mateys, here is She Who Milks!


After some work mounting her onto the base she was more or less completed. I spotted a few things I chose to touch up on, but after that the model was done.


I added grass tuffs to the base as I wasn't too pleased with how the modeled ground  looked in the end. They add a touch of "reality" and they also help break up the monotony.


After conferring with Da Masta Cheef, we agreed that the model looked more interesting holding the detached tank hatch in her raised claw.


All in all, I am happy with how it turned out and I am keen to paint more Slaaneshi models in this scheme.


Oh, the Hero Bases were a good investment for making your models appear a bit more interesting and part of an environment as opposed to being just a another game piece.


Wednesday, March 29, 2017

The Return of She Who Milks! (Part 3)

With the main model pretty much finished it was time to work on the base. This is one of the new Hero Bases that I thought would make an impressive pedestal for She Who Milks, my venerable Keeper of Secrets minature.

The first thing I did was basecoat the turret using Graphite which is made by Craftsmart. I pretty much have this color scheme memorized having perfected it around the year 2000, but I still wanted to reference it to be sure. So I dug out one of my Imperial Guard tanks from it's place of storage..

Long lost cousins: a comparison.

I knew that GW retooled the Leman Russ Battle Tank almost a decade ago, but I was unaware that the turret was so radically altered. The design features are all present, with exception to that bit that comes out on the side that I put the smoke launcher on, it's just clearly wider. Now, I realized that this new turret isn't from the actual tank model, it's a base, but it's still very interesting to compare the two.

The original Leman Russ tank.

Another reason to pull out this old tank was to see how I detailed it, what decals I used, etc. I hope to get back to my Imperial Guard at some point and when I do I would like them all to match!

Pewter Grey.
Pewter Grey was washed on to the turret over the Graphite. By washing, what I did was mix the paint 50/50 with water and dab the color on by going from the edges of a given surface toward the center leaving the Graphite exposed in center and around rivets. I then went in an applied thick concentrations of Pewter Grey around the edges.

Country Grey dabbling.
 Using water I thinned down some Apple Barrel Country Grey and dabbed it onto turret. This created a faux blending effect giving the model a faux sense of depth. I then hit the edges with a thicker layer of this paint.

White Scar highlights.
Finally I applied a thick dot of White Scar to all the rivets and bolt head. I next slightly thinned some White Scar for the final highlight.

Next came the insignia on the side of the turret. I wanted it to resemble my finished Russ so I hand painted a red square and after digging through my vast decal collection found a mailed fist holding a sythe that I thought went well with the older Russ.

Badge added.

As I typically do I once again used Microsol to wet the transfer. After that I dry brushed, in very strong strokes, the mud. I wanted it to appear like a splatter effect as if this turret smashed hard into the mud. It's a subtle effect, as I didn't want it to distract too much from the whole model.

Mud splatter.
You'll also notice that I finished the blown out gun barrel. I used Niln oil and Abaddon Black to achieve this look. Bolt Gun metal (the shiney mid- '90s version) was applied to the break points along the barrel.

With that I was done with the turret. Next I figued out where She Who Milks would stand and drilled a hole for her foot peg. After I tore her off of her previous base, I painted a Worm Purple dot on the bottom of her foot to mark where the other pin should go, then quickly placed her on the turret. The wet paint marked exactly where I needed the pinhole to go.

Mounting prep.
Next I drilled and pinned a bit of brass rod into place.

Foot pinned.
 And finally, after a bit of work and some super glue, she was now mounted!

Mounted!

It seems that this post is running long, so I'll reveal her in all her glory in the next post (part 4), so I hope you come back and check out the final model.


Monday, December 02, 2013

RT era Imperial Guard paint scheme on current era Cadians

You just got to love a title that only 40K players can understand, right? Yes, I painted up some of the current plastic Imperial Guard in the old Warhammer 40,000 Rogue Trader-era Necromunda Spiders color-scheme circa 1989.

 
OK let me expand on why I did this: a long time ago I showed off some of my pal's old Rogue Trader era Imperial Guard guys that I painted for him along with some of the models that he had others do for him as well. For the sake of professional anonymity I refer to him on this blog as 'The Doctor'. You can see those Imperial Guard models here. I have always loved that paint scheme, and in ages past when my brother was collecting IG, we agreed to paint his Cadians in this color scheme as well. I only ever did the one model and you can see him below.

The single painted metal Cadian in my collection.
He remained a test-bed for future color schemes, only that I painted him so long ago (somewhere between '97-'00?) that I either couldn't recall the exact paint combination or that one of the mid-tones is a GW color that dried up on me which there isn't a current analog for. Regardless, I was determined to try it. Spotting a fairly cheap 'plug and play' box set of 5 Imperial Guard troopers I figured it would make for a fairly quick experiment. It was around about this time last year, perhaps a few months further back, that I mostly finished these guys, but for whatever reason, I just didn't. In the next pic you can see one of these troopers behind a Long Fang that I completed back in February of this year (2013) to give you a clue as to the "smorgasbord" painting technique that is my painting station! LOL! 

"Finish me! Finish me!"

Slight digression: this pic was apparently overlooked when I did the Long Fang posts. You can see how I like to paint the components prior to assembly, and you can see the original Space Wolf decals along with the backpack where I hand-drew the Space Wolf logo. By the way, that orc next to the guardsman is to be completed very soon!

OK, back on topic: During my Thanksgiving break I wanted to finish something! Finishing Mad Dok Grotsnik was quite rewarding and I wanted to do that to something else. For the sake of doing something different, and because they were so close to being finished, I chose these guys. Just a few touch ups, and they were done.

"Finished and ready to kill!"

Funny thing is, it took me the longest to complete their transfers. I opted to stick with the 2nd edition era regimental organization that was laid out in the original Codex: Imperial Guard.

A glimpse at the 2nd Ed Codex Imperial Guard Regimental Organization table and I was set
I very much prefer this over the vague and lazy system that the GW design team has used since. You can't see it on the old Cadian at the start of this post, but he has a patch colored Yellow Company, Blue Platoon. I decided that all of my old metal Cadians will retain this scheme, but the newer style models will be part of a different platoon. I feel that this works great since that is how they are purchased in the current Codex (i.e. by the platoon). My Valhalla models will be part of the same company as well, but I haven't thought out what their companies will be yet.

The platoon I chose for these models was Red Platoon. So, what I did next was locate the appropriate decal sheet from my decades old collection of GW decals, and paint on the colors after gauging the size of the decal. I then transferred the decal (this always makes me cuss like a pirate). I then trimmed off any excess, before finally going over the clear parts of the decal with black paint to not only cover that clear area, but to cover the over-lapping color and to add additional bond to the decals. The next pic should help with making sense of the result of what I just described.


"Red Platoon lives!!!"
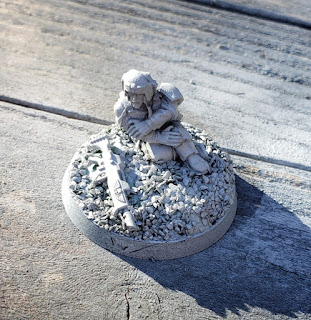
Using the Middenland Tufts on Mad Dok Grotsnik a few days before, I was really hooked on how well this looked and how easy they are to apply. I decided to not use static grass on these guys but only use a few strategically placed tufts. I thought this gave a more hardened battlefield look, and it also reminded me of the New Mexico desert (of which I have some rather fond memories of).

All grunts have to have accessories!
 I found a guy selling an IG bitz bin on ebay awhile back and scored a whole bunch of backpacks, arms, guns, etc. I painted up one of these to add to this unit just to break up the monotony of these push-and-play models (BTW-these guys suck in that regard: you have to glue their guns in if you want them to stay on during game play!). I am most likely going to be putting together a small force of British soldiers for Bolt Action (Gasp!) and I used this backpack as an excuse to play around with their color scheme. I think it turned out good.

What does the future hold with this unit and my Imperial Guard in general? I'm not sure at the moment. With rumors of them getting a new Codex soon, I'm reluctant to put the whole army together only to have to reorganize it like I seem to have to do the Space Wolves each time they get a new book. So I will hold off on them for now, although I want to take this Squad up to unit size of 10. The perfectionist in me (having seen the blown up photos while typing this post) wants to do some slight touch up on their guns. Otherwise I like how they look with this paint scheme. I do think future models will loose the yellow wing motifs and I will probably try out a metallic gold instead.

I hope you enjoyed; let me know if you think this works!