Showing posts with label Terminators. Show all posts

Monday, January 15, 2024

Leviathan Terminator Librarian (Part 4)

We have arrived to the finale of this saga. 


To date, I think this is my best painted Ultramarine model. I'm quite pleased with how it turned out. Although I can see room for improvement, which is encouraging  and it will push me to do even better next time. 


In particular I think the psychic energy on the armor could've turned out more brilliantly. I think this is due to how I used the '90s Ultramarines Blue on top of the Macrage Blue which is a brighter result than the examples I reviewed when I started this guy. 


I decided to not have the runes glowing on the book, since I think it's obviously a tool not being used by this model in the moment. 


The most frustrating part of this whole model, yes even more than dealing with repairing the axe after the cat broke it, was the chapter decal. The one you see here is the final one. The first one sort of broke apart when I attempted to apply gloss ('ard Coat) to the decal after I used Microset on it.  After scraping off the whole decal I was able to get it to work the second time. 


I have definitely been spoiled by Guillman Fleshwash, it has completely transformed how I paint skin tones, especially faces.  I have seen examples of this model painted so that it's eyes are glowing the same color as the psychic effects on the armor and axe. Which is a pretty sweet way to tie it altogether. But I was happy with the model at this point and opted out of missing around with the face.


The next thing to do is to put him, securely, into a box and ship him off to Seattle! Hopefully he'll conquer whatever shelf/desk he comes to occupy.  I have to confess, if I can find time for a game I would love to get this guy into a battle report, but those odds are still low...


UPDATE:

The model made to Jay successfully and intact! Hooray for that victory! 


Friday, January 05, 2024

Leviathan Terminator Librarian (Part 3)

 Continuing on from parts One and Two it was time for the psychic glow stage. Referencing a GW painting tutorial after I had went and bought paints I found that somehow I still bought the wrong one. I was supposed to get Baharroth Blue but instead bought Hoeth Blue. The names were just too elfy I guess. I also picked up two Contrast Paints that I thought might work also: Pylar Glacier and Briar Queen Chill. Both of these look like they would look amazing on this model the Pylar Glacier being the one closest to Baharroth Blue. 

Choices. 

I went for the Pylar Glacier. I applied two layers as it does run a bit thin. And I think it turned out alright. 

Glowy psi power.

I am particularly pleased with how well the effect worked on the outstretched hand. 

Hand blasting for the win! 

I am also found of how well it seemed to work on the runic script on the paldrons. 

Runes of power! 

Almost a week went by before I could back to it but before I could calamity ensued. Or is it CATlamity? One of my more adventurous cat decided to explore my hobby table and when Mrs. Neverness attempted to intervene he wrecked almost everything in his mad dash to escape. Surprisingly, only one model was damaged and it just happens to be this one. The axe head busted off and I found it under the living room couch. 

Disarmed by a cat.

So this project is temporarily stalled while I fix the axe. Hopefully it'll be restored without too much effort in Part 4 of this series...


Monday, December 25, 2023

Leviathan Terminator Librarian (Part 2)

 Here is more work-in-progress on this chap continuing on from the last post.  In this first pic I added some more white ink, mostly to the hand. White was added to the skull on the ground as well as this dude's face. Base coats were also applied to the purity seals also. 


Guliman Flesh Contrast Paint was washed over the face. This is probably my favorite of the Contrast Paints, it never fails to give me the results that I want. The tubes that run down his sides got a coat of White as well. Macrage Blue layered onto the armor at this stage. 


For this next step I used Retributor Gold on the ornamentation that adorns this majestic suit. On the armor I once again telied on my mid-'90s Ultramarines Blue. That is still the best paint for Ultramarines, you can't convince me otherwise. 


Contrast paints were used on the tubes. I think this was a good choice, as the colors really pop and it took little time to accomplish. The skull was give a cost or two of Skeleton Horde Contrast Paint. I live that color also. I am thinking about trying it out on a Deathwing Terminator that I have hanging around to see how well it will work, but that's for another time.


Most of you probably tuned in to see if I pulled off the Psychic energy painting, and I am sorry to say that hasn't happened yet. Mostly due to me not having the proper paint color (or even a good analog for it). 30 years in this hobby and I simply didn't have those colors.. So I eventually made it to a game store and picked up a few that should do the trick. I will attempt that in the next part of this series which, hopefully, will see this guy wrapped up. 

Until then, have a merry one! 

Thursday, December 14, 2023

Leviathan Terminator Librarian (Part 1)


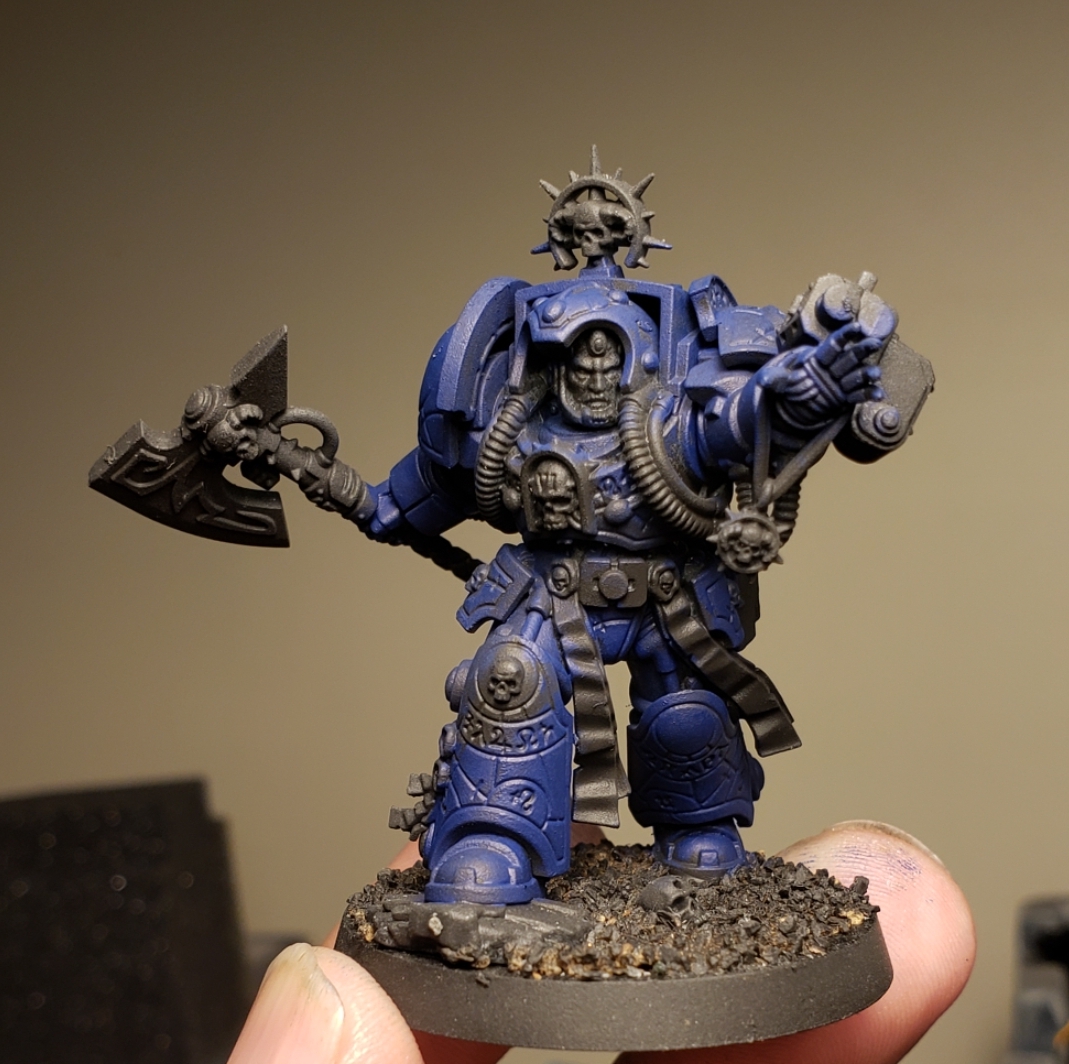
Freshly assembled. 

My brother's birthday was back in August, and all he asked for from me was a painted Terminator Librarian painted in Ultramarines colors. Long-time readers might recall that he passed his old Ultramarines army to me about ten years ago. This was his primary army back when we played together (1st thru 3rd editions of WH40k).  Having a cool model to display in his office was something that he's wanted for a while now. 

Gritted up and Prined. 

And his most successful hero from that time had to be his Chief Librarian in Terminator Armor. The model he used was the original plastic one that we got in the RTB16 Terminators and Tyranids boxed set. I was up to the challenge, and at the time the 10th edtion launch box, Leviathan, was still quite fresh from it's recent launch, so I was able to acquire the Terminator Librarian from eBay with relative ease. 

Base coat on the armor.

This model has got to be the best Terminator Librarian model ever. And I was a big fan of some of the older versions. But painting those runic recesses with psychicly charged energy was immediately intimidating. I stalled myself by deciding that I needed to freshen up my Ultramarines paint scheme, this is why I pushed my Assault Intercessors up in the queue. During this time I found an inspiring tutorial on how to do the pychicly charged runes on the Terminator armor. I have seen a lot tutorials that used inks that seemed to flow off of the brush into the grooves of whatever model they were working on. They made it look easy. So much so that I figured I would give it a shot myself. I figured I would this model, using that technique  as I didn't see many other alternatives that I liked. 

Real white ink. 

I had some white ink in my art supplies that I use for my 2-D B/W art that thought might do the trick. This stuff was a bit thick so I added a dot of water to my mix to get the flow I wanted, but not so thin so as to undermine it's opaque nature.

White ink applied.

And that's as far as I have gotten with him. As I waited for the ink to dry, other matters called me to attention. But I wanted to share some sort of progress with you all, so here it is. My goal is to try to get this guy done by Christmas but it's feeling unrealistic.  Maybe by New Year''s Day so he can make the 2023 year-end review? We'll see...


Wednesday, September 29, 2021

Deathwatch Terminators (Part 1)

It's  time to go a bit more elite and add some Terminators to my blossoming squads of Deathwatch marines. Like all of the other Deathwatch projects I am working on, these were started back in August with the hope that I could get some of them done in time for the 2021 Inquisitional Conclave. Clearly, I bit off more than I could chew in the time allotted!

WIP of Deathwatch Terminators. 

Before I bought the models assembled above, I had only intended to build-out one squad of them from the odd ball models I had lying about. This got out of hand quickly as some of my choices led me to abandon some ideas in lieu of others. For example, I now have the start of a Deathwing Terminator squad as a result of discovering that filing off the Crux Terminatus on the left shoulder pad, and then filing it down so as to fit the Terminator sized Deathwatch shoulder pad, was far too much work. So those models were replaced. 

The filed down pad.

Another abandoned project was the notion of magnetizing all of them so as to maximize the potential weapons load out. After doing this on a single model, and being a bit disappointed in the result, I decided to just stick with the load out I was most likely to just use the most anyway. 

Magnetic arm options.

In one of the above pics you likely noticed the Terminator with the red head. That head was a spare from a Space Marine Heros Blood Angels Terminator who, as you can see below, has also been requisitioned into the Deathwatch.

A Space Marine Hero Joins the Deathwatch.

All-in-all, these guys are beginning to come together and soon I hope to have a formidable Deathwatch force to send out to destroy xenos filth and other vile foes of the Imperium. 


Wednesday, October 17, 2018

Terminator Basing (Part 4)

Here is Joshi Krakenbite, completed sans decals. He brings the fire and thunder to his unwitting foes.
Joshi Krakenbite, assembled for battle!

I tried to make the flame patterns on his Heavy Flamer as seen on the 40k 2nd edition era Space Wolves Codex.  I think it's pretty close... but I will let you guys judge how well it's turned out. You can view that cover back in Part-3.

"Fire! Fire!!!"

Rear view.
It didn't take much from the previous post to get this guy done. Well done sans decals anyway. I won't decal these Wolf Guard until I get them all done.

If I had a hammer...
Next up is Bori Stonepaw. This guy carries a Cyclone Missile Launcher. I had hoped to have him a bit futher along for this post, but I hope you can appreciate how far he has come along regardless.

Bori Stonepaw
Progress shall continue, but in the meanwhile I have a Dreadtober pledge to finish up...

Wednesday, September 26, 2018

Terminator Basing (Part 3)

The crux.
Here is a project that had been pretty-much abandoned. We last featured these guys many years ago in Terminator Basing Part-1. (Part 2 featured Sven Axegrinder). Well, the recent Space Wolf Codex has me wanting to do some Space Wolf projects, or rather finish some. Also, I was thrilled/horrified to see how well thunderhammers perform in 8th ed, and wanted to get some of my own onto the battlefield. Reviewing my models, I came to the floss box that contains my Wolf Guard. They have somehow managed to accumulate paint over the years despite my never posting any blog posts about them, although none of them were ever finished. Indeed, they have come a long way since I first posted anything regarding them.

The slow march of progress....

I mentioned above being impressed by thunder hammers. This was not the first time that this has happened, and at one point roughly 10 years ago, I purchased an upgrade blister pack that contained five thunder hammers, stormshields, and Terminus Crux shoulder pads. They were some of the worst mold-line and flash infested metal miniatures I have ever bought from GW. And for whatever reason, I simply never moved on with the project. Until Now. Joshi Krakenbite will be the first bearer of a thunder hammer for the Wolf Guard of Sven Axegrinder.

Wolf Guard Joshi Krakenbite steps up! 
Recently while looking at all of the previous covers for the years worth of Codex: Space Wolf tomes, it struck me that the original one from 1993 (2nd Edition) is the only one with accurate colors on the armor. For the most part anyway. It is weird as the models pictured inside it were not all this dark, yet the ones in the current (2018) codex are, even though that book's cover depicts a Space Wolf painted in a non-Shadow Grey look. It is just a strange observation. But back to the '93 edition: I have always loved this cover. The model from that time has the exact heavy flamer, and sort of like I did for a recently inspired Goff ork I am going to attempt to paint that heavy flamer just like that!

Heavy Flamer snip from the '93 Codex: Space Wolves. 
And here it is so far! I Still need to add flame patterns onto the yellow band. Overall I think I got the colors pretty close.

Old school Heavy Flamer.
I tried use the newer colors that GW produces for the Space Wolves but they just aren't bright enough. Luckily I have enough old Space Wolves Grey to get these Wolf Guard painted but I do need to track more down at some point.

Space Wolf colora done, pending touch-ups. 
Unlike some older models, I have decided to paint the acquilla in metallics. I think I like this look, and it is less difficult to pull off than my previous preference.

Krakenbite's progress.

This guy is almost done, and I shall continue to work on him, and his brothers, before Dreadtober-2018 begins. So far I am really enjoying this trip back to Fenris...


Sunday, November 13, 2016

Anachronistic 40k: Assault Cannon

This is the first of a new post category for this blog where I recollect, possibly rant, on certain past elements of the hobby and game (specifically Warhammer 40,000) that I miss or just recall fondly.

The idea for doing this came to mind after reading a half-assed  nostalgia article on another site. It showed flashy pics, which were nice, but those articles never seem to be written from the POV of someone who actually played the game during that time. The article  never amounted to anything more substantial than "Golly gee, I found a 25 year old White Dwarf and I gotta show you this -it's neat!" Here I shall attempt to try to do it right.

First up: the Assault Cannon. This was one of the heavy hitting weapons that was nerfed heavily for the 3rd edition of the game and hasn't ever been brought up to the power level it once enjoyed. When it first appeared in the early days of 40k, it's availability was exclusive to the wargear inventory of the Terminator armored Space Marines. It's background stated that it's RoF (Rate of Fire) was so great that the barrels of the gun would often have to be discarded after battle due to heat damage. The Assault Cannon could fire "hundreds of shells per second", causing the barrels to reach 300 degrees Fahrenheit, warping them to the point that they had to be discarded and replaced.

The original Following Fire rules from Warhammer 40,000: Rogue Trader
It's important to discuss the original rules for Following Fire in the Warhammer 40,000 game. It had the potential to be utterly devastating. Especially in the hands of high Ballistic Skill wielders. Even when used by moderate or average BS users the potential for some serious hurt was high. All you had to do was hit and wound. It did not matter if the target made his saving throw or not, you could roll again! This was open-ended until you ran out of targets. You were restricted only by how many targets you had within the 4" bubble of the previous shot. As you could see with how the phrasing is used in this rule it was perceived at the time that the word "original" was only applied to the 2nd shot, and that the 4" bubble expanded with each subsequent shot. You were not restricted by units either, therefore, an army packed too close together could be reduced to hamburger so long as the attacking player didn't roll a 1.

Hamburger is what you became when the Assault Cannon was pointed at you! Terminators back then all had BS5, and within 12" he had a +1 to his die roll as well. Not many things could hold up against Str 8 either, and more often or not, he was wounding his foes on a 2+. Rare was the foe that could Save against this gun as it had a -3 Save modifier. Oh, and if you didn't save your model would take D10 wounds. Nasty.


The original stats for the Assault Cannon.
However you just couldn't have that kind of firepower without a drawback, even back in the untethered days of Rogue Trader 40k (unless you played Eldar, that caveat has always been in the game). Thus was born the rules for Jams. Sanity was eventually introduced in the Battle Manual, which was essentially a 1.5 edition of Warhammer 40K. It was excellently written with a clean and concise re-explanation of the rules as well as an introduction to many new rules. One thing that was changed were the rules for Following Fire, now called Sustained Fire, in that if you rolled a 1 to hit after the 1st shot with a Sustained Fire weapon, you jammed the weapon! You would have to spend your next round doing nothing but trying to clear the jam.

My favorite style-period  of Wayne England's art. 
The Assault Cannon was particularly leashed by the Battle Manual in that if you rolled a 1 to hit on your second or any subsequent to hit roll, you not only jammed but you ran the risk of blowing up and being killed instantly if you rolled a 6 on a D6!

Assault Cannon rules from the 40K 1st Ed Battle Manual

Warhammer 40,000 2nd edition arrived in fall of 1993. It was a true step up for the game as far as how clean it's presentation was. It was a true evolution of the game and you can see from the weapon profiles that the biggest change was the introduction of Sustained Fire Dice. The Assault Cannon got 3 of these with a potential of 9 shots but also a bigger potential for a crap ton of jams. Most players from this time will tell you that they spent more times clearing out those annoying jams than they did actually killing anything! You could still blow up by rolling 3 jams at the same time. This was easier to do than the risk roll required in the previous Battle Manual.

Assault Cannon rules from te 40K 2nd ed rule book -also called the Battle Manual.
Another note about the two books called The Battle Manual. Not only did they have the same cover image, but the layout was similar to each other and in some cases they even used the same art! This is why you are seeing the same Terminator knee in both of the pics above.

Fun Fact: Prior to the 2nd Ed Codex: Chaos, Chaos Terminators could have Assault Cannons!

Some people cheered when the 3rd edition tossed out the Sustained Fire Dice and simply added a number to the Weapon Type. The Assault Cannon became a Heavy 3 Str 6 weapon. This means it is now limited to three shots and if you rolled a triple 1 with these three shots the Assault Cannon would be destroyed. Furthermore it's awesome ability to shred armor was reduced to AP 4, meaning that basic Marines now stood up to these things as if they were las guns. It's 32" range was now 24" also reducing it's threat range. The Assault Cannon was now a shadow of it's former self...

Over the editions, and let's face it, editions 4-7 have all been a series of evolved tweaks of the 3rd edition, the Assault Cannon has continued to remain a semi-marginal weapon. Although the jam rules are gone, and the Weapon Type now changed to Heavy 4, Rending, I still have a hard time visualizing this cannon shooting "hundreds of shells per second". The Rending Special Rule is nice, as it does add a bit of killing potential back into this weapon, But only a bit.


Where Assault Cannons shine now is when you see them mounted on vehicles, especially in twin-linked pairs such as on a Baal Predator or a Land Raider Crusader. I started thinking about them more recently after reading through the Death Watch Codex and discovering that I could field whole Terminator squads with them, and thinking "wow, imagine this unit in a 2nd edition game!"

Many Space Marine armies have all had newer and more deadly weapons introduced over time that make me wonder why the GW Game Designers don't just simply revisit these older weapons that form some of the standards and icons that players over the decades associate with the Warhammer 40,000 universe. Obviously you can tell that I still lament the loss of the power this weapon once had. If it was me, I would double the current amount of shots to 8. I could be happy with 6 though. Regardless, this weapon needs to get it's fear back.


All of the images in the post are Copyright Games Workshop and are used here for the purposes of review and not as a challenge to their individual copyrights. 


Sunday, April 08, 2012

Sven Axegrinder (Terminator Basing Part 2)

You may have heard the hollowing 'cross the vales of Fenris on the cold moonless nights that herald the return of Wolflord Sven Axegrinder!
"I don't recognize him, he has arms!" -Da Masta Cheef.
Sven has been accumulating paint for at least 10 years. In fact he's been mostly done for about 6 of the past few years, I just kept being distracted by other things. Actually that excuse applies to most of my models... however while looking over my Space Wolves after I returned last weekend from my latest work-mission, Sven really appealed to me as something I should get done. So here he is completed and in natural light!

If you're young you might be wondering where I found this model, if you're my age you'll recognize this as this as the original Rogue Trader era Terminator Captain. Made for use with both Warhammer 40, 000 and Space Hulk (no doubt that 1989 was THE year of the Terminator Marine!). This model has more wargear on him than he can currently take in the game. I often just take the powerfist, as I'm fighting things that require the extra strength! But I have been known to just count that sheathed sword as a frostfang. If you look at the fingers on the power fist you'll see 4 jokaro digital weapons, and mounted on top of the power fist you'll see an auxiliary grenade launcher. ....I really want to play a game of Rogue Trader again after writing all of that!

What kept putting me off on finishing this model had to have been all the ridiculous amounts of details. I seriously doubt any single model before or since has this many skulls -tiny skulls all over it! Remember also, that at this point GW was still sticking with an approximate 25mm scale vs. the slightly larger 28mm ("heroic") scale it would soon adopt with the onset of Warhammer 40.000 2nd edition. Still, I think the Crux Imperialis looks awesome on this model even still.


In my earlier articles, Terminator Basing Part 1, you'll see the technique I use for revitalizing my old metal terminators to current base size. Sven here was one of the first models that I used this technique on (just now finished him! LOL) and as a result he doesn't have a lot of other objects on the base, just a mound of dirt. Really at this time, I was just trying to see if the technique would work or look goofy. I'm happy to say I think it works!

Here he is stacked up with two of the models from that article. Not much progress made on these guys yet other than a base coat on a few of them and the rocks. Note that I also paint my bases as I paint my models for a more seamless experience and, I feel that I also get a more 'natural' looking result by achieving a bit of unity with the model and his supposed environment.

The angle of that pic does give a sense that Sven is a bit small, and he is indeed, compared to the current plastic Terminator kits. For example:

I compared his powerfist to that of the dead terminator from the latest Space Hulk game, and you can definitely appreciate the slight difference!

But compared to his Lone Wolf buddy, I feel he holds up well!

And the Lone Wolf now has a flocked base. I also touched up a few spots that stuck out to me when I last photographed him (but now I see another, a red speck below his eye! *sigh*)