Showing posts with label Fighta bomba. Show all posts

Sunday, June 03, 2018

Waaagh Plane (Part 4)

It has been way too long since I worked on this thing. Waaagh-plane-part-3 was posted back in 2012, and apart from me performing some repairs to it in 2014 I haven't done anything with it. My primary excuse has been my lack of enthusiasm concerning the rules for the Orks during the last two editions. My recent painting of the Dark Eldar Venom, specifically it's canopy, got me thinking about how I needed to paint the canopy for this Dakkajet...and finally finish this project. The next motivation came from Da Masta Cheef's challenge of an Ork vs. Ork 8th edition game...

Re-glueing the rear wing.
After exhuming the thing from it's foam-filled tomb/case I found that, once again, one of the rear wings was detached. I immediately set about repairing it while taking the time to contemplate what I needed to do to it to complete the model.

The base seemed like a natural place to start. I wanted to get this battle-ready as soon as I could, and the base is essential to that goal.

Debris added.

I found some busted up Space Marine bike parts in a bitz box and scattered them about the base. My Orks have a long history turning Space Marines into debris so seemed only fitting.

Base mostly done.

I needed to get this done ASAP so I finished the drybrushing on the ground first but had to stop just at the basecoat for the bike debris.

I did perform some minor touch-ups to the paint job on the plane itself, but the next stages won't be truly complete until after I apply the decals. But it was needed in our quasi-annual Ork vs. Ork game, details of which will be coming soon, so off to the front it went!

Da Maiden Flight!

Tuesday, April 08, 2014

Repairing the casualties

Casualties have occurred during my move. You might've seen the state of my Dakkajet at the end of the last post. That's one of the casualties.

The other major (that I am aware of) damaging event occurred when I dropped a block of battle foam and Skippy the Bloodthirster attempted to use his pewter wings to fly. The resulting impact saw him quickly disassemble all over the hard floor!


Silly Daemon, gravity is not your friend!
 

Luckily he separated at the joins and was rather easy to reassemble. And thankfully, his paint job wasn't damaged either.

"Thank you! Thank you! Yes, I'm happy to be here!"

"Now if I can just convince Neverness to use me in a game..."
 As you can see in the background, I fixed the Dakkajet as well...

Restored!
However, after re-cutting the case I ran into a similar problem with those tail wings wanting to snap off, so I decided to just lower them, and I decided this configuration looked more sleek to me, which is what a rip-roaring fighta jet ought to look like, yes?


I am determined now to simply finish this model, so look for future updates on this.

Monday, March 17, 2014

Deconstructing the man-cave

I am in the middle of moving, so all hobby activities are at a stand still. More accurately, the hobbies have all been packed up and put away. The first stages of my move was cutting out the protective foam for my Orc & Goblin army's carry-case. Something I regret that I didn't do sooner. As organized as I like to think I am, this move has taught me that I need to be better at it.

The first thing I tackled was the main painting station (the 2nd painting station (which was always intended to be temporary) in the living room was disassembled while the Orcs & Gobos were put up.

The main painting station. 

To the left, a bin full of hobby supplies

The stool next to my comfy painting chair, with unbuilt Space Wolves under it.

The stack of models I acquired from my Brother
 In the man-cave is a closet that is stuff full of unassembled models. It really is a shrine to geekdom, and a museum of GW products. Some of these I broke down and condensed, and I will probably do it again after the move. All of those Star Wars and D&D boxes were emptied out and the minis dumped into a box, again, for space reasons.  
The plastic shelf in the closet

The wire shelves in the closet. 

The other wire shelf in the closest. The white boxes are blister packs
 As you can see I have a lot to move! 25 years of being in this hobby, and I rarely trade or sell off stuff, has caused me to acquire quite a bit. And yet I want more? What's in this stuff to make it so addictive?!

The books and boxed sets. 
 The bit bins above my painting station took some thinking. I have moved these things in my previous career, and if you don't secure them right, the drawers will open or stuff will fall out of the back of them. I went through these this past Friday night (stayed up until 3am) bagging all of the bits in snack bags. The next morning my dear friend Redbird came over and plastic wrapped up the bins for added security. That Redbird sure is swell!
Wrapped up and ready to move!
 After a day of solid packing, here is the paint station:
Yes, I forgot the surface was a marbled gray...

The bonus lesson here was allowing my Dad to pack my Orc Fighta Bomba into a Walmart gun case that I had on hand....

....the road to heck is paved with good intentions! LOL, it's all good though, as the model wasn't finished yet and I can easily reassemble it.


This move is well underway, eventually I will show you the next incarnation of the man-cave.

'Til eventually!

Tuesday, October 02, 2012

Waaagh! Plane part 3

WAAAGH!!! This was a WIP test-fit. The cockpit fits so snug and perfectly into the hull.

Work on the Dakka jet continued last week. In fact I was going to blog about that and some recent gaming with Da Masta Cheef and Warfrog but instead felt the urge to rant about Dark Angel jet cycles. Well, back to our usual fare of WIP pics. 

Leaving off with Part 2 I started by applying layers of the old Blood Red on top of Scab Red, but the paint was going on thinner than I preferred, creating an interesting kind of red-rust effect. In this pic below I have half painted it and wanted to see what it looked like blown up on the digital camera for a more critical take on it.

After coating the whole plane, I glued together the pilot and the cockpit assembly, I will do the 'glass' canopy absolutely last (after sealing the plane- that last!). Considering that I tweaked my flesh-tone style with this ork, I'm pleased with how he game out: quite vibrant!


Here's a full body shot of the pilot snapped into the jet. The green does contrast perfectly against the red.

 It's subtle, but here you can see the "streaking" effect that I was getting with the Blood Red. I switched to a newer paint that just picked up, Mephiston Red. This new paint...I'm not sure about. I LOVED the color it was when I applied it, but I have never seen an acrylic paint change it's hue to the degree that this color did when it dried. Still, I was OK with the look, and thought that it solidified the color and got rid of the streaking.


The tail wings. Clearly who ever designed this jet never built model planes as a kid! It's like the one piece that doesn't easily attach (even though it looks like it should!) and I had to use paint pots to hold them in place while the glue dried. Here's the right one...
Here's the left one.


These are the colors that I have been working with. The Evil Sunz Red I will attempt to use as a highlight color.

And here it is with this stage done. I will next apply that Evil Sunz Red highlight, then start adding all the battle damage and wear to it while at the same time working up the metals and the rusty panels.

Red ones do go fasta! It's not a belief, it's a life-style!
\
Sadly I had hoped to get this done over the weekend and in time for this upcoming one, but work beckons me away, so I won't get it done quite as early as I wanted too. Shame 'cause I was going to take it up to Ohio for it's maiden flight.

I hope you've enjoyed this so far.

-neverness

Tuesday, September 25, 2012

Waaagh Plane! Part 2


Continuing on where I left off (and no, I won't explain the time gap), the pic above is of the pilot that I finished...oh, back in June or July. Whenever this kit was released! LOL, it's now mid-September (see, there is a gap) and this pic was taken that far back. Anyway, this part of the model isn't assembled beyond this stage yet, as it makes sense to me to put the cockpit in absolutely last after the model has been sealed or fixed or glazed or whatever so as not to screw up the clear canopy. I know, I could mask it, but that's always more work than necessary. Personally, I don't understand why GW has the canopy added so early in the instructions, I can't imagine how many kids must screw up their kits trying to paint past and around the bloody thing!

So Sunday evening I got the bug to just tackle this thing. I went an applied another mostly thinned layer of Scorched Brown to the fuselage. Then I added a thinned down layer of Scab Red

I then added a a thicker layer of Scab Red.


Her is the underside, when I remembered to added the landing...skid? Ski? and grab hook. Seeing these things land has GOT to be entertaining by the way... I wonder if the Kult of Speed comprehend slowing down to land or do they not stop until the jet has been hooked by something?


Here is where I stopped Sunday night. As you might be able to tell, I was adding bits to it as I painted it. Seems to be the best way to do this kit, and so I'm pleased...


After reading the stats and options, it occurred to me that only a fool would pass up the option to by additional Super-Shoota's and since there's another set in the kit for the Blitz Bomba, I figured, what the heck! Go for broke man! This next pic shows that extension as well as the 1st wing.


Here's both wings with the scorched brown base coat. For that 'rusted through' look. Should make more sense when it's finished.


...and here it is with the added scab red and all the super-shoota's added! That's a lot of Dakka for me Dakka Jet!


We're almost there, soon it'll be ripping apart the gitz that stand before us!

...next update in the Chinese New Year! :)


Sunday, July 01, 2012

Waaagh Plane! pt1

Having been virtually enslaved by my work, I have been unable to focus much at all on this hobby, however the week that the new Ork Fightabomber came out, I was determined to not only get it on the day of release, but to start working on it immediately!  I took it right home and after drooling on the sprues and reading through the White Dwarf to pick which rules variation I liked most (I like them all), and failing to pick one, I wasted no further time and took the sprues out for a good priming.

Now before I continue, I must state that I've wanted a full-scale ork jet since the days of Rogue Trader. I got my start building models with model aircraft, jets in particular, with a mantra of 'More missiles!!!' as I overburdened my Harrier Jump-jets with every rocket in the box. It only seems natural to me that Orks would have the same mindset. When the concept first appeared in Epic-scale, I knew it was only a matter of time before I got my wish. Fast forward 20 years, and I finally get my wish! LOL!

Here are the sprues being primed on the front porch. Nothing terribly exotic or particularly blog-worthy about spraying sprues black, only that I had to beware of the smooth and flat surfaces to avoid leaving finger prints or smudges in the primed layer that could bug me later.

While doing this I took the opportunity to prime a few other models, namely my Fenrisian Wolves and an ammo grot that were all lounging about on my painting table. I have pics of these, but I will save them for when I actually write about them.

After I primed these, I decided to let them sit for a day before tackling them any further. The next night I based coated all of the orkoid fleshy bits while they were still on the sprue.

I began assembly while watching the Game of Thrones marathon (leading up to the season finale) in case your curious as to what i'm watching in the background there.


I used the rubberband method to ensure the tightest bond I could for the main hull. I painted the internal turbine a metallic color prior to assembly as there are parts of if you can see through a grill in the top.

A week later I had the chance to work more on the kit, and my focus was on the pilot. I decided to experiment a bit with my classic paint scheme. Usually I paint orks/orcs with a black prime, then Dark Angels Green, then with a thined out Bilious Green building up to a thicker bilous green. I then mix yellow and green ink until it looks almost like radiator fluid. I thin that with some water, then glaze the whole model (the green bits anyway). I will then re-highlight with Bilious Green, then add a final highlight of Sunburst Yellow. To see examples of this checkout Orky love, and this pic below of my Warboss (Ror-Ruk the Ravager)

Ror-Ruk, with his 'ammo grot' on the alien savanah of Backyardistan III. during the 'Stomp'n of Da Pointy Earred Git' campaign, 892M41.

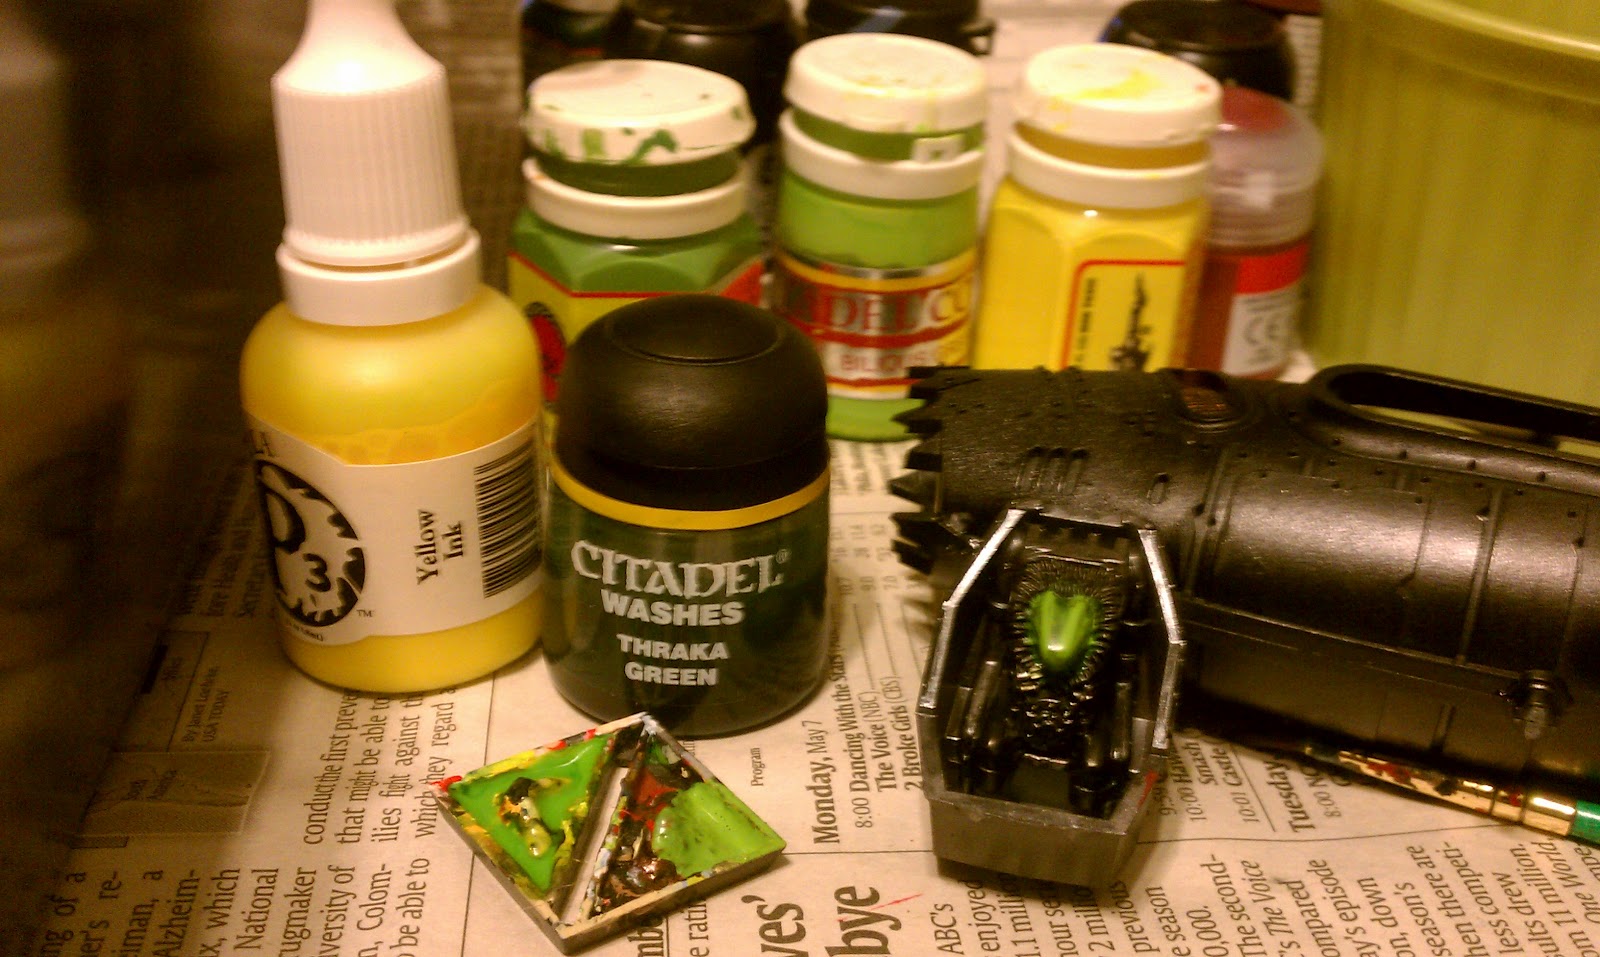
My Bilious Green paint pot is only half-gone, but it's 23 years old now and I can't find an analog for it. However I still have a lot of Goblin Green, so I decided to try that as my base coat for my ork pilots. I figured with him being sealed inside the kit you probably wouldn't be able to tell the difference if there is much of one. This next pic shows this and the palette that I mixed my colors on (yup, the underside of a base).


Here is the main torso after the inking (and the exact paints I used to get it this far). Also, I really like the look of old metal, not  a bright more recent rust, but the dark rusted look of an old yet still being used machine. I have achieved this look in the past  by just painting a thinned-down brown wash over black with some highlighted areas painted darker. I painted the main fuselage of the jet this color to act as the base coat for when I start applying the red coats.


That's it for now, more to come soon.